Java’s Time Machine: A Guided Tour Through 12 Years of Change -2

Featured

Hi Everyone,

In Part 1, We’ve covered till Java 14 changes in Part 1. Let’s pick up from there.

Note – Here I have highlighted only important features and skipped few features that has minor improvement across multiple versions.

Let’s drive in.

Java 15

Sealed Classes and Interfaces (Preview): Java 15 introduced sealed classes and interfaces, which are new features that allow you to restrict which classes or interfaces can extend or implement a given class or interface. This can be useful for modeling domain concepts, improving the security of libraries, and making your code more readable and maintainable.

example – sealed interface Drawable permits Circle, Square, Rectangle {}

Hidden Classes: Java 15 introduced hidden classes, which are classes that cannot be used directly by the bytecode of other classes. Hidden classes are intended to be used by frameworks that generate classes at runtime and use them indirectly via reflection. A hidden class is defined as a member of an access control nest, and it can be unloaded independently of other classes.

Hidden classes have a number of benefits, including:

  • Reduced memory usage: Hidden classes can help to reduce memory usage by avoiding the need to load classes that are only needed for a short time.
  • Improved performance: Hidden classes can help to improve performance by reducing the overhead of loading and unloading classes.
  • Increased security: Hidden classes can help to improve security by making it more difficult for attackers to access classes that are not intended to be exposed.

Here is an example of how to use a hidden class:

// Define a hidden class
@NestMember
private static class HiddenClass {}

// Create a new instance of the hidden class
HiddenClass hiddenClass = new HiddenClass();

// Use the hidden class
// ...

// Unload the hidden class
Lookup lookup = MethodHandles.lookup();
lookup.removeClass(HiddenClass.class);

Hidden classes are a powerful new feature in Java 15 that can help you to reduce memory usage, improve performance, and increase security. However, it is important to use hidden classes with caution, as they can also make your code more difficult to understand and maintain.

Here are some examples of how hidden classes can be used:

  • A web framework could use hidden classes to generate classes that represent dynamic resources, such as web pages or API endpoints.
  • A compiler could use hidden classes to generate classes that represent the intermediate representation of a program.
  • A security framework could use hidden classes to generate classes that represent security policies or permissions.

Overall, hidden classes are a valuable new feature in Java 15 that can make your code more efficient and secure. However, it is important to use them with caution and to understand the implications of using them.

Java 16

Foreign-Thread Context: Java 16 introduced the Foreign-Thread Context (FTC) API, which allows Java threads to interact with threads from other programming languages. This can be useful for developing applications that need to interact with native code or with code that is written in other programming languages.

The FTC API provides a number of features that make it easy to interact with foreign threads, including:

  • Thread scheduling: The FTC API allows you to schedule foreign threads to run on Java threads. This can be useful for offloading work to other threads or for running code that is not Java-compatible on Java threads.
  • Thread synchronization: The FTC API provides a number of features for synchronizing foreign threads with Java threads. This can be useful for preventing race conditions and for ensuring that data is shared safely between foreign threads and Java threads.
  • Thread communication: The FTC API provides a number of features for communicating between foreign threads and Java threads. This can be useful for passing data between foreign threads and Java threads or for signaling events between foreign threads and Java threads.

The FTC API is still under development, but it has the potential to revolutionize the way that Java applications interact with other languages and native code.

Vector API (third incubator): The Vector API is a new Java API that provides a more efficient way to process data vectors. A data vector is a collection of elements of the same type, such as an array of integers or a list of strings.

The Vector API provides a number of features that make it more efficient to process data vectors, including:

  • Vectorized operations: The Vector API allows you to perform operations on data vectors in parallel. This can significantly improve the performance of your code, especially when processing large data sets.
  • Automatic vectorization: The Vector API can automatically vectorize loops and other code constructs. This can save you the time and effort of manually vectorizing your code.
  • SIMD support: The Vector API supports SIMD instructions, which can further improve the performance of your code on modern processors.
  • Improved performance: Vector operations can be performed much faster than traditional for-loops, because they operate on multiple elements of an array at the same time.
  • Reduced code complexity: The Vector API provides a simplified interface for performing vector operations, which can help to reduce the complexity of your code.
  • Increased portability: The Vector API is designed to be portable to different hardware platforms, which means that your code will be able to take advantage of the vector processing capabilities of your hardware.

example –

int[] array = {1, 2, 3, 4, 5};
Vector vector = Vector.of(array);
int sum = vector.add();
exp-2
import java.util.Vector;

public class VectorExample {
    public static void main(String[] args) {
        // Create a vector of integers
        Vector<Integer> vector = new Vector<>();
        vector.add(1);
        vector.add(2);
        vector.add(3);

        // Sum the elements of the vector using the vectorized sum() operation
        int sum = vector.stream().sum();

        // Print the sum of the elements of the vector
        System.out.println(sum);
    }
}

To use the Vector API, you simply need to import the java.util.vector package and create a Vector object. You can then add elements to the Vector object and perform odperations on the elements of the Vector object using the vectorized operations provided by the Vector API.

Java 17

Enhanced pseudo-random number generators: Java 17 introduced a new API for pseudo-random number generators (PRNGs). This new API provides a number of benefits, including:

  • Improved performance: The new PRNG API provides improved performance over the legacy PRNG API.
  • More flexibility: The new PRNG API provides more flexibility for generating pseudo-random numbers. For example, the new API allows you to specify the desired seed and algorithm for generating pseudo-random numbers.
  • Increased security: The new PRNG API provides increased security for generating pseudo-random numbers. For example, the new API uses more secure algorithms for generating pseudo-random numbers.

To use the new PRNG API, you simply need to create an instance of a Random Generator object. You can then use the Random Generator object to generate pseudo-random numbers of various types, such as integers, floats, and doubles.

Here is an example of how to use the new PRNG API to generate a random integer:

RandomGenerator randomGenerator =RandomGenerator.of("Xoroshiro128PlusPlus");
int randomNumber = randomGenerator.nextInt();

Java 18

UTF-8 by default: Java 18 makes UTF-8 the default charset for all implementations, operating systems, locales, and configurations. This means that all of the APIs that depend on the default charset will behave consistently without the need to set the file. encoding system property or to always specify charset when creating appropriate objects.

Simple web server: Java 18 introduced a new Simple Web Server command-line tool (jwebserver) that can be used to serve static files from the current directory and its subdirectories. This is a useful tool for prototyping, debugging, and testing web applications.

To start the Simple Web Server, simply run the jwebserver command in the directory that contains the static files that you want to serve. The Simple Web Server will then start listening on port 8000 by default.

To access the Simple Web Server, simply navigate to http://localhost:8000 in your web browser. You should then see a listing of the static files that are available.

To start the simple web server, simply open a terminal window and navigate to the directory where you want to serve the static files from. Then, run the following command:

jwebserver

This will start the web server on port 8000. You can then access the web server by visiting http://localhost:8000 in your web browser.

If you want to serve the static files from a different directory, you can specify the directory path as an argument to the jwebserver command. For example, the following command will start the web server on port 8000 and serve the static files from the /path/to/static/files directory:

jwebserver /path/to/static/files

You can also specify a different port number as an argument to the jwebserver command. For example, the following command will start the web server on port 9000:

jwebserver --port 9000

The simple web server in Java 18 is a useful tool for serving static files. It is easy to use and can be used to quickly and easily create a simple web server.

Code snippets in Java API documentation: Java 18 introduced a new @snippet tag for the JavaDoc’s Standard Doclet, to simplify the inclusion of example source code in API documentation.

The @snippet tag can be used to declare both inline snippets, where the code fragment is included within the tag itself, and external snippets, where the code fragment is read from a separate source file.

Here is an example of an inline snippet:

/**
 * Calculates the sum of two integers.
 *
 * @param x The first integer.
 * @param y The second integer.
 * @return The sum of `x` and `y`.
 */
public int add(int x, int y) {
  // @snippet java
  return x + y;
}
Here is an example of an external snippet:
/**
 * Calculates the factorial of a number.
 *
 * @param n The number.
 * @return The factorial of `n`.
 */
public int factorial(int n) {
  // @snippet factorial.java
  if (n == 0) {
    return 1;
  } else {
    return n * factorial(n - 1);
  }
}

Reimplemented core reflection with method handles: Java 18 reimplemented the core reflection API using method handles. This was done to improve the performance and security of the reflection API.

Method handles are a more powerful and flexible way to manipulate the members of a class dynamically. They are also more efficient, as they can avoid the need to generate bytecode at runtime.

The reimplemented reflection API is still fully compatible with the existing reflection API. This means that existing code that uses reflection will continue to work without any changes.

Here are some of the benefits of reimplementing the core reflection API with method handles:

  • Improved performance: The reimplemented reflection API can be significantly faster than the old reflection API, especially for complex reflection operations.
  • Reduced memory usage: The reimplemented reflection API uses less memory than the old reflection API, as it does not need to generate bytecode at runtime.
  • Improved security: The reimplemented reflection API is more secure than the old reflection API, as it makes it more difficult for attackers to exploit reflection vulnerabilities.

Overall, the reimplemented reflection API in Java 18 is a significant improvement over the old reflection API. It is faster, more efficient, and more secure.

Here are some examples of how to use the reimplemented reflection API in Java 18:

import java.lang.invoke.MethodHandle;
import java.lang.invoke.MethodHandles;
import java.lang.invoke.MethodType;

public class Example {
    public static void main(String[] args) throws Throwable {
        User user = new User("TestUser", 25);
// Obtain method handles to access and modify field
        MethodHandle getNameHandle = MethodHandles.lookup()
                                                 .findGetter(User.class, "name", String.class);
        MethodHandle setNameHandle = MethodHandles.lookup()
                                                 .findSetter(User.class, "name", String.class);

        String currentName = (String) getNameHandle.invokeExact(user);
        System.out.println("Current name: " + currentName); 
        setNameHandle.invokeExact(user, "Nikesh");
        // get the updated field
        String updatedName = (String) getNameHandle.invokeExact(user);
        System.out.println("Updated name: " + updatedName); 
    }
}

class User {
     String name;
     int age;

    public User(String name, int age) {
        this.name = name;
        this.age = age;
    }
}

//output - 
Current name: TestUser
Updated name: Nikesh

Internet-address resolution SPI : Java 18 introduced a new Internet-Address Resolution SPI that allows applications to plug in their own custom Internet address resolution logic. This can be useful for applications that need to resolve Internet addresses in a specific way, such as for security reasons or to support custom DNS servers.

The Internet-Address Resolution SPI is based on the Service Provider Interface (SPI) pattern. This means that applications can register their own custom Internet address resolution providers with the SPI. When an application needs to resolve an Internet address, it will consult the SPI to find a registered provider and then use that provider to resolve the address.

To register a custom Internet address resolution provider with the SPI, you need to create a class that implements the InternetAddressResolver interface. This interface has a single method, resolve(), which takes an Internet address string as input and returns an Internet address object.

Here is an example of a custom Internet address resolution provider that resolves Internet addresses using a custom DNS server:

import java.net.InetAddress;
import java.net.InternetAddressResolver;

public class CustomInternetAddressResolver implements InternetAddressResolver {

    private final String dnsServerAddress;

    public CustomInternetAddressResolver(String dnsServerAddress) {
        this.dnsServerAddress = dnsServerAddress;
    }

    @Override
    public InetAddress resolve(String hostname) throws Exception {
        // Resolve the hostname using the custom DNS server
        return InetAddress.getByName(hostname, dnsServerAddress);
    }
}
//To register this custom provider with the SPI, you would call the following code:
java.net.InetAddressResolver.register("com.example.CustomInternetAddressResolver");

Java 19

Project loom: Project Loom is an experimental project in Java 19 that aims to bring lightweight concurrency to Java. It does this by introducing a new programming model called virtual threads, which are more lightweight and efficient than traditional Java threads.

Virtual threads are managed by the JVM and are not tied to OS threads. This means that the JVM can schedule virtual threads much more efficiently than OS threads, and it can also create and manage many more virtual threads without impacting performance.

Project Loom also provides a number of other features that make it easier to write concurrent programs, such as:

  • Structured concurrency: Structured concurrency allows you to write concurrent programs in a more structured and sequential way. This can make your code more readable and maintainable.
  • Tail calls: Tail calls allow you to optimize recursive functions by avoiding the need to stack frames. This can improve the performance of your concurrent programs.
  • Delimited continuations: Delimited continuations allow you to capture the state of a running program and then later resume the program from that state. This can be useful for writing concurrent programs that need to handle errors or cancellations gracefully.

Project Loom is still under development, but it has the potential to revolutionize the way that concurrent programs are written in Java.

Here are some of the benefits of using Project Loom:

  • Improved performance: Virtual threads can be scheduled much more efficiently than OS threads, and the JVM can also create and manage many more virtual threads without impacting performance.
  • Reduced memory usage: Virtual threads are much more lightweight than OS threads, so they use less memory.
  • Improved scalability: Project Loom can help applications to scale to larger numbers of concurrent users.
  • Simplified concurrency: Project Loom makes it easier to write concurrent programs by providing features such as structured concurrency, tail calls, and delimited continuations.

Overall, Project Loom is a promising new project that has the potential to make Java a more efficient and scalable platform for developing concurrent applications.

Foreign function & memory API: The Foreign Function & Memory (FFM) API is a new API in Java 19 that enables Java programs to interoperate with code and data outside of the Java runtime. This API enables Java programs to call native libraries and process native data without the brittleness and danger of JNI.

The FFM API is based on two earlier incubating APIs: the Foreign-Memory Access API (JEPs 370, 383, and 393) and the Foreign Linker API (JEP 389).

The FFM API has a number of benefits, including:

  • Improved safety: The FFM API is safer than JNI because it provides a number of features that help to prevent common errors, such as buffer overflows and memory leaks.
  • Improved performance: The FFM API is more performant than JNI because it avoids the need to generate and manage JNI bridges.
  • Increased flexibility: The FFM API is more flexible than JNI because it provides a variety of ways to interoperate with native code and data.

Here is an example of how to use the FFM API to call a native function:

import java.lang.foreign.Linker;
import java.lang.foreign.MemoryAddress;
import java.lang.foreign.MemorySession;

public class FfmExample {
    public static void main(String[] args) throws Exception {
        // Get the address of the native function
        MemoryAddress functionAddress = Linker.getInstance().loadLibrary("mylib").lookupFunction("my_function");

        // Create a memory session
        MemorySession session = MemorySession.open();

        // Allocate memory for the arguments to the native function
        MemoryAddress[] arguments = new MemoryAddress[1];
        arguments[0] = session.allocateArray(Integer.TYPE, 1);

        // Call the native function
        Linker.getInstance().downcall(functionAddress, arguments);

        // Free the memory allocated for the arguments to the native function
        session.close();
    }
}

The Foreign Function & Memory (FFM) API is a new API in Java 19 that enables Java programs to interoperate with code and data outside of the Java runtime. This API enables Java programs to call native libraries and process native data without the brittleness and danger of JNI.

The FFM API is based on two earlier incubating APIs: the Foreign-Memory Access API (JEPs 370, 383, and 393) and the Foreign Linker API (JEP 389).

The FFM API has a number of benefits, including:

  • Improved safety: The FFM API is safer than JNI because it provides a number of features that help to prevent common errors, such as buffer overflows and memory leaks.
  • Improved performance: The FFM API is more performant than JNI because it avoids the need to generate and manage JNI bridges.
  • Increased flexibility: The FFM API is more flexible than JNI because it provides a variety of ways to interoperate with native code and data.

The FFM API is still under development, but it has the potential to revolutionize the way that Java programs interact with native code and data.

Here are some additional benefits of using the FFM API in Java 19:

  • It can help to reduce the amount of JNI code that needs to be written.
  • It can make Java programs more portable and efficient.
  • It can open up new possibilities for Java programs to interact with native libraries and data.

Java 21

Structured concurrency: Structured concurrency is a programming model for writing concurrent code in a more structured and sequential way. This makes it easier to read, understand, and maintain concurrent code.

Structured concurrency is based on the idea of using a structured task scope to manage the execution of concurrent tasks. A structured task scope is a container for concurrent tasks that provides a number of features, including:

  • Task execution: The structured task scope provides a way to fork new tasks and to wait for tasks to complete.
  • Task cancellation: The structured task scope provides a way to cancel tasks.
  • Error handling: The structured task scope provides a way to handle errors in tasks.

Structured concurrency is a new feature in Java 19 that is still under development. However, it has the potential to revolutionize the way that concurrent programs are written in Java.

Java 21 includes the Structured Concurrency (Second Incubator) feature, which is a preview feature that extends the Structured Concurrency feature introduced in Java 19. The Second Incubator feature adds a number of new features, including:

  • Subtask cancellation: The ability to cancel subtasks of a structured task.
  • Subtask joining: The ability to wait for all subtasks of a structured task to complete before returning.
  • Subtask results: The ability to get the results of all subtasks of a structured task.
  • Improved error handling: Improved support for handling errors in structured tasks.

The Second Incubator feature is still under development, but it has the potential to make it even easier to write concurrent programs in Java.

Here is an example of how to use the Structured Concurrency (Second Incubator) feature to cancel a subtask:

import java.util.concurrent.StructuredTaskScope;

public class StructuredConcurrencyExample {
    public static void main(String[] args) throws Exception {
        // Create a structured task scope
        StructuredTaskScope scope = new StructuredTaskScope.ShutdownOnFailure();

        // Fork a subtask
        scope.fork(() -> {
            // Do some work
            // ...
        });

        // Cancel the subtask
        scope.cancel();

        // Join the structured task scope
        scope.join();
    }
}

If the subtask is successfully cancelled, the join() method will return immediately. Otherwise, the join() method will wait for the subtask to complete before returning.

The Structured Concurrency (Second Incubator) feature is a valuable new feature in Java 21 that can make it easier to write robust and efficient concurrent programs.

Thanks for reading. you can connect me @linkedin

AWS serverless application model(SAM) and AWS toolkit

Featured

SAM : The AWS Serverless Application Model (SAM) is an open-source framework for building serverless applications. It provides shorthand syntax to express functions, APIs, databases, and event source mappings. With just a few lines per resource, you can define the application you want and model it using YAML. During deployment, SAM transforms and expands the SAM syntax into AWS CloudFormation syntax, enabling you to build serverless applications faster. ref – AWS doc.

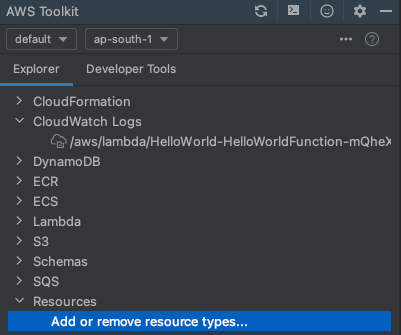
AWS toolkit : The AWS Toolkit is an open source plug-in that makes it easier to create, debug, and deploy Java and Python applications on Amazon Web Services. Apart from this AWS toolkit provides explorer in IDE like: CloudFormation, CloudWatch logs, DynamoDB, ECR, ECS, Lambda, S3, SqS and Schemas etc.

Assuming you have AWS CLI already install on your machine , in case if not installed, please follow this link,

Here is quick command sharing for MacOs.

#brew install awscli
#aws --version

Assuming you have already created your AWS account, now here we are going to configure aws account credentail on local machine for later use. here we will create default profile so it will be auto detected by AWS toolkit.

#aws configure
##it will ask you verious input as below
AWS Access Key ID [None]: xxxxxxxx
AWS Secret Access Key [None]: xxxxxxx
Default region name [None]: xxxxx
Default output format [None]: Json 

Now, AWS CLI is configured after above command successfully executed.

Let’s installed SAM on local machine.
(assuming you have homebrew install on mac machine)

#brew tap aws/tap
#brew install aws-sam-cli
#sam -version

In case if you are windows or Linux user please visit this link , here you will find detail installation steps.

Now, if you have successfully installed SAM on local machine, I would suggest you to install “AWS TOOLKIT” plugin into your IDE, in my case it is intellij Idea.

Once AWS toolkit successully installed, you will see the “AWS toolkit” section in bottom left corner of intelliJ idea, once you clicked on this you will see similar window.

Note – We require SAM pre-installed before AWS toolkit to generate SAM project.

Let’s jump on IDE to generate sample AWS serverless project.

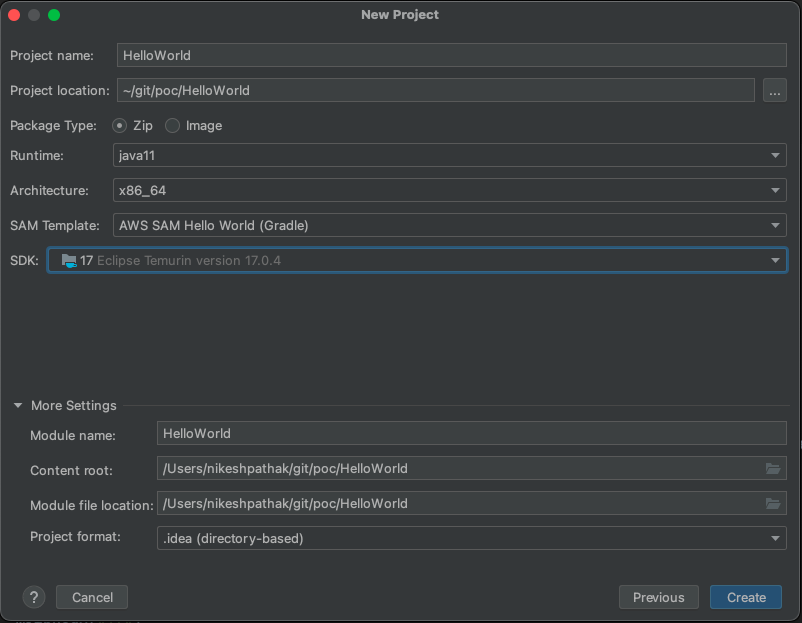
Intellij Idea -> File -> Projects -> AWS -> Next -> …

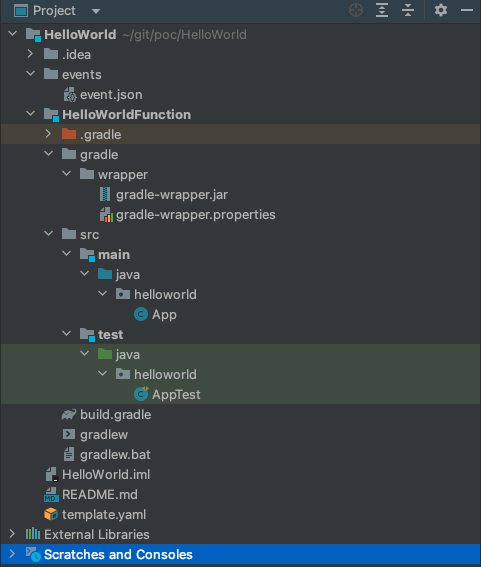
after clicking on ‘create’ button you will see “HelloWorld” project generated.


This project contains source code and supporting files for a serverless application that you can deploy with the SAM CLI. It includes the following files and folders.

  • HelloWorldFunction/src/main – Code for the application’s Lambda function.
  • events – Invocation events that you can use to invoke the function.
  • HelloWorldFunction/src/test – Unit tests for the application code.
  • template.yaml – A template that defines the application’s AWS resources.

The application uses several AWS resources, including Lambda functions and an API Gateway endpoints. These resources are defined in the template.yaml file. You can update the template to add AWS resources through the same deployment process that updates your application code. more details you can find in README.md file

Let’s build and deploy project –

#sam build
output:
Build Succeeded

Built Artifacts  : .aws-sam/build
Built Template   : .aws-sam/build/template.yaml

Now sample project is successfully bulid , lets deploy this project, currently we don’t know about the further steps and input so we will use below command with –guided option, here you will asked multiple quesiton by SAM related to env.

#sam deploy --guided
OutPut:
Configuring SAM deploy
======================

        Looking for config file [samconfig.toml] :  Not found

        Setting default arguments for 'sam deploy'
        =========================================
        Stack Name [sam-app]: HelloWorld
        AWS Region [ap-south-1]: ap-south-1
        Confirm changes before deploy [y/N]: y
        Allow SAM CLI IAM role creation [Y/n]: Y
        Disable rollback [y/N]: N
        Save arguments to configuration file [Y/n]: y
        SAM configuration file [samconfig.toml]: 
        SAM configuration environment [default]: 

        Looking for resources needed for deployment:
         Managed S3 bucket: aws-sam-cli-managed-default-samclisourcebucket-hyha0acabvgp
         A different default S3 bucket can be set in samconfig.toml

        Saved arguments to config file
        Running 'sam deploy' for future deployments will use the parameters saved above.
        The above parameters can be changed by modifying samconfig.toml
        Learn more about samconfig.toml syntax at 
        https://docs.aws.amazon.com/serverless-application-model/latest/developerguide/serverless-sam-cli-config.html

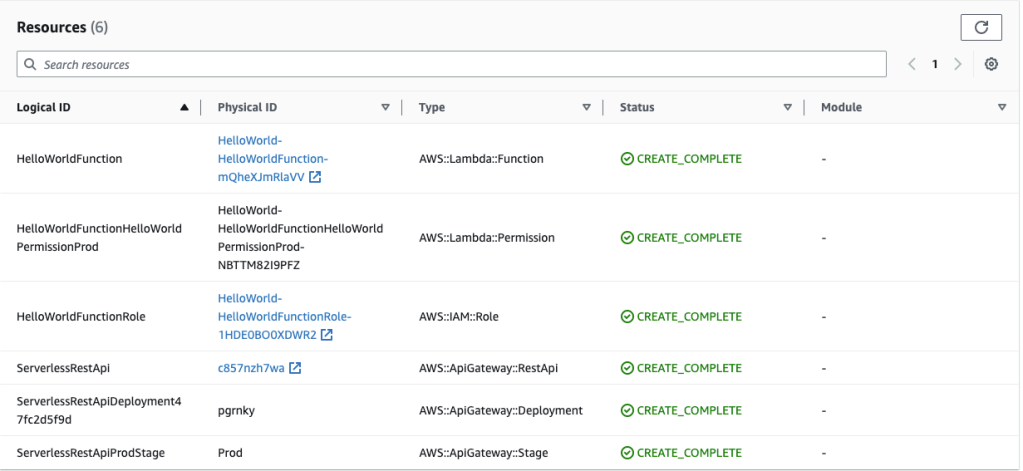
After providing all the inputs , it will initiate deployment of serverless application and provide inline status related to resource creation. let’s visit on aws console page to view, if stack is created or not.

Resources create with helloWorld example,

Now we have verified created resource and they are working fine, lets delete these resources to avoid unnsessery cost.

#sam delete --stack-name HelloWorld
output- 
 Are you sure you want to delete the stack HelloWorld in the region ap-south-1 ? [y/N]: y
        Are you sure you want to delete the folder HelloWorld in S3 which contains the artifacts? [y/N]: y
        - Deleting S3 object with key HelloWorld/6f1511bb62dde9a7dc63aab2fdc56321
        - Deleting S3 object with key HelloWorld/70a14d89c5765111d1922ecf99ce00a5.template
        - Deleting Cloudformation stack HelloWorld

Deleted successfully

Here I have tried to quickly present the simple way to kick start serverless project. let me know if you think any specfic steps should be included into this.

Featured

Kafka: Kafka consumer with SpringBoot

After successful configuration of producer with spring-boot. In this post we will configure consumer with spring-boot.

Let’s get started.

Step 1: Start the Zookeeper and Kafka server on your local.

Step 2: Create a spring boot project with Kafka dependencies.

Create a spring boot project, and add below dependencies in your build.gradle / pom.xml

implementation group: 'org.apache.kafka', name: 'kafka-clients', version: '2.6.0'
implementation group: 'org.springframework.kafka', name:'spring-kafka'

Step 3: Consumer application properties

server.port=6000
kafka.bootstrap.server=localhost:9092
kafka.topic.name=greetings
kafka.group.id=G1

Step 4: Consumer Configuration

We need to create ConsumerFactory bean and KafkaListnerContainerFactory bean. Kafka consumer configuration class requires @EnableKafka annotation to detect @KafkaListener annotation in spring managed beans.

@Configuration
@EnableKafka
public class KafkaConsumerConfig {
    private static Logger log = LoggerFactory.getLogger(KafkaConsumerConfig.class);

    @Value(value = "${kafka.bootstrap.server}")
    private String bootstrapAddress;

    @Value(value = "${kafka.topic.name}")
    public String topic;

    @Value(value = "${kafka.group.id}")
    private String kafkaGroupId;

    @Bean
    private ConsumerFactory consumerFactory() {
        log.info("Initializing consumer factory ...");
        Map props = new HashMap<>();
        props.put(ConsumerConfig.BOOTSTRAP_SERVERS_CONFIG, bootstrapAddress);
        props.put(ConsumerConfig.GROUP_ID_CONFIG, kafkaGroupId);
        props.put(ConsumerConfig.KEY_DESERIALIZER_CLASS_CONFIG, StringDeserializer.class);
        props.put(ConsumerConfig.VALUE_DESERIALIZER_CLASS_CONFIG, StringDeserializer.class);
        return new DefaultKafkaConsumerFactory<>(props);
    }

    @Bean
    public ConcurrentKafkaListenerContainerFactory kafkaListenerContainerFactory() {
        ConcurrentKafkaListenerContainerFactory factory =
                new ConcurrentKafkaListenerContainerFactory<>();
        factory.setConsumerFactory(consumerFactory());
        return factory;
    }

Step 5: Implement listener to consume messages

@Service
public class KafkaConsumerListener {
    private static Logger log = LoggerFactory.getLogger(KafkaConsumerListener.class);

    @KafkaListener(topics = "${kafka.topic.name}", groupId = "${kafka.group.id}",
            containerFactory = "kafkaListenerContainerFactory")
    public void consumeGreetings(@Payload String greetings, @Headers MessageHeaders headers) {
        log.info("Message from kafka: " + greetings.toString());
    }

Spring supports one listener can listen from multiple topics.

@KafkaListener(topics = "topic1, topic2", groupId = "G1")

Also multiple listeners can be implemented for same topic. But listeners should be from different groups.

Summery :

In this post I have shown you how to configure Kafka consumer and consume messages from the topic in a spring-boot application.

Featured

Generate Spring project base template in Java/Kotlin/Groovy

There is various way we can generate REST application base template in java. Today I’m going to share you one of the example.

Why we require to generate the template ?

Going with your own project structure is good for example or test project. but if we talking about production application or some of serious project we must require to follow the standard. generally if we talk about Framework like spring that have certain rules to read application properties and they have defined standard project structure. and that is very use-full and self explanatory.

you can see on of this example, where clearly defined ‘src’ section that contain test and main application source. apart from this there is HELP.md where user can define there application details. also there is gradle config files are there that can be replace with maven if you choose maven build system.


├── HELP.md
├── build.gradle
├── gradle
│   └── wrapper
│       ├── gradle-wrapper.jar
│       └── gradle-wrapper.properties
├── gradlew
├── gradlew.bat
├── settings.gradle
└── src
    ├── main
    │   ├── java
    │   │   └── com
    │   │       └── example
    │   │           └── demo
    │   │               └── DemoApplication.java
    │   └── resources
    │       └── application.properties
    └── test
        └── java
            └── com
                └── example
                    └── demo
                        └── DemoApplicationTests.java

Now these are The basics template every time create these structure manually is not worth to spend time. if there is already tools out there.
Spring introduced spring initialiser that can help you generate base template where developer only require to generate and import into IDE.

How to do this?

visit – https://start.spring.io/

Hope you like this 🙂

Spring boot Admin

Featured

When the actuator introduced, the first thing came into my mind – What if we have a common place where I can see my all applications endpoints and I can manage them from there itself?

Thanks to the code-centric team they make this possible. if you are not aware of the Actuator, I would suggest you to first read about the actuator library.

Managing application using actuator endpoint is quite difficult, because if you have bunch of applications you won’t have a common place to see them all. But now with the help of Spring boot admin, it’s easier to view the dashboard for multiple microservices at a single place.

In this articles I’m going to describe you basic example of Spring boot admin client and server. CodeCentric has Introduce Spring boot Admin Server and it has inbuilt UI Dashboard that show the clients details. Isn’t it really amazing where you can see all your available clients at one place? Let’s see how we can implement this.

How it works?

Let’s do server and client setup

Spring boot admin server setup

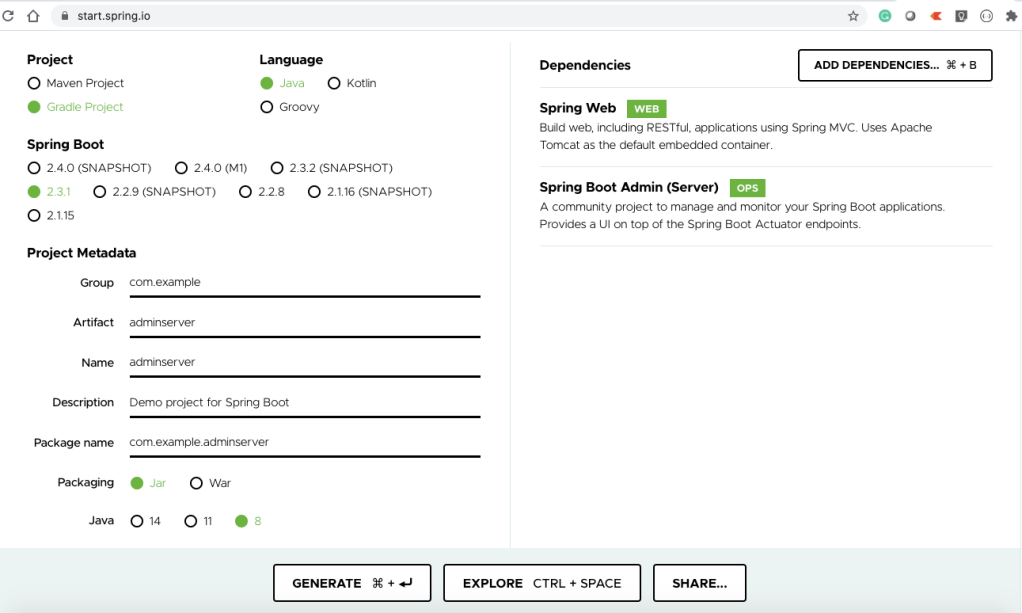
First go to spring initialiser and generate sample project

start.spring.io screenshot to generate project

Once project generated you will find below dependencies into your build.gradle file.

'de.codecentric:spring-boot-admin-starter-server'

Now let’s enable Admin server in project using @EnableAdminServer annotation

@SpringBootApplication
@EnableAutoConfiguration
@EnableAdminServer
public class SbadminserverApplication {

	public static void main(String[] args) {
		SpringApplication.run(SbadminserverApplication.class, args);
	}

}

Logically dashboard should be secure, So let’s include basic authentication using Spring Security

implementation 'org.springframework.boot:spring-boot-starter-security'
import org.springframework.context.annotation.Configuration;
import org.springframework.security.config.annotation.web.builders.HttpSecurity;
import org.springframework.security.config.annotation.web.configuration.WebSecurityConfigurerAdapter;

@Configuration(proxyBeanMethods = false)
public class SecuritySecureConfig extends WebSecurityConfigurerAdapter {

    @Override
    protected void configure(HttpSecurity http) throws Exception {
        http.formLogin().loginPage("/login").permitAll();
        http.logout().logoutUrl("/logout").permitAll();
        http.csrf().ignoringAntMatchers("/actuator/**", "/instances/**", "/logout");
        http.authorizeRequests().antMatchers("/**/*.css", "/assets/**", "/third-party/**", "/logout", "/login")
                .permitAll();
        http.authorizeRequests().anyRequest().authenticated();
        http.httpBasic(); // Activate Http basic Auth for the server
    }
}

Now assign default password to your server, if we don’t define Spring security password it will generate a random password at runtime and you can see the generated password in console.

spring.security.user.name=admin
spring.security.user.password=admin

If you want to update server ‘Titles’ you can use below properties.

spring.boot.admin.ui.title=AdminConsole

Spring boot admin client setup

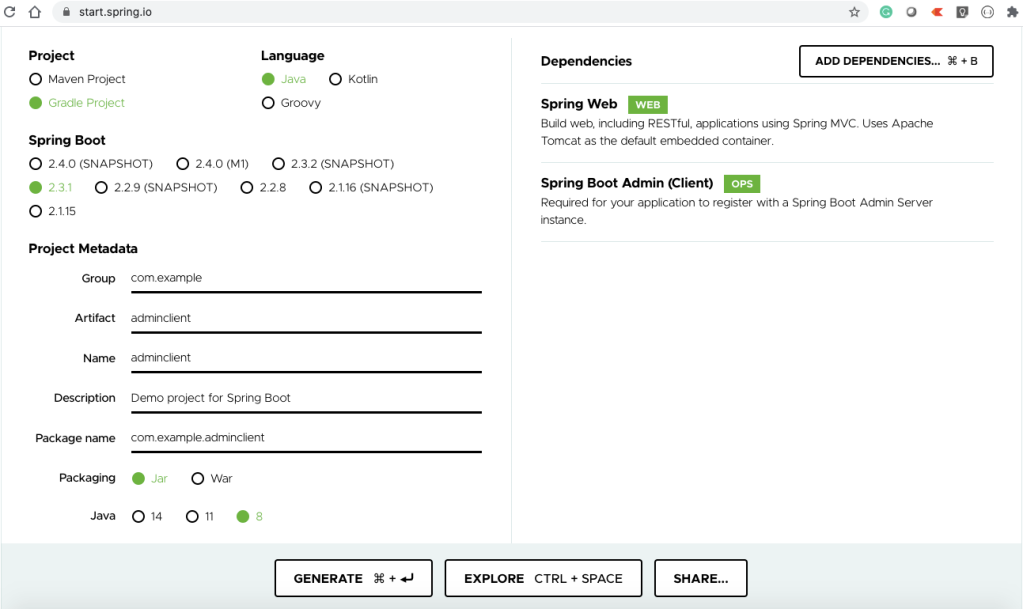
Generate client project

Once the project generated, configure server details into client properties files, make sure if you running both on the same machine, the port should be different to avoid a port binding error.

spring.application.name=sb-client
server.port=8888
management.endpoints.web.exposure.include=*

spring.boot.admin.client.url=http://localhost:8080
spring.boot.admin.client.username=admin
spring.boot.admin.client.password=admin

Now run both of the project and login into the server.

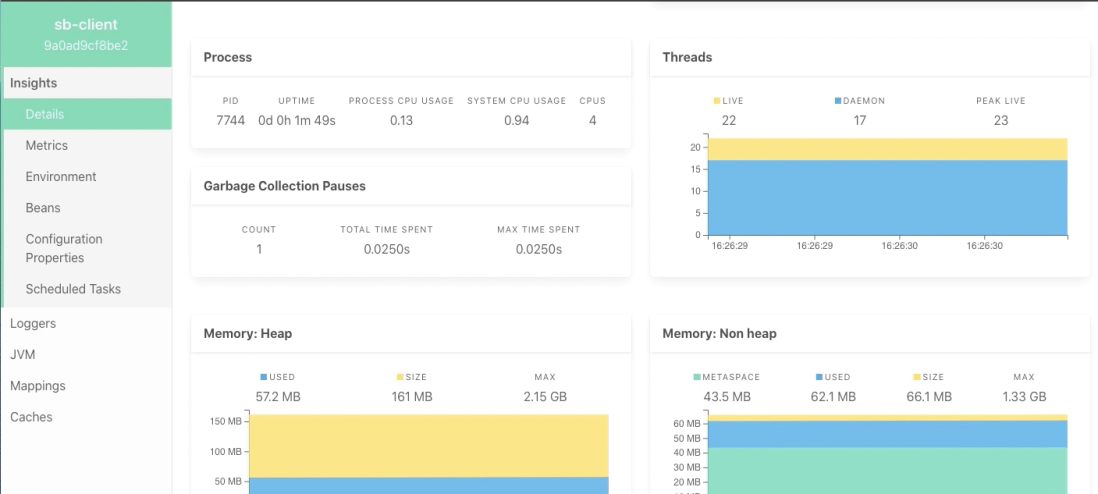
Spring boot admin server dashboard

Source link

Summary : If you are looking for a prebuilt dashboard for your microservices, you can consider it one of the options. As this project is under an open-source umbrella you can update some of the features as per your requirement.

Hope you like this 🙂

Featured

Spring boot actuator

Actuator

An actuator is a spring boot sub-project that helps to expose production-ready support features against Spring boot application.

Key features offered by actuator

  • Health check : You can use health endpoint to check the status of your running application.
  • Monitoring and Management over HTTP/JMX : Actuator support HTTP endpoint as well as Java Management Extensions (JMX) to provide a standard mechanism to monitor and manage applications.
    • Logger: It provide feature to view and update the logs level.
    • Metrics: Spring Boot Actuator provides dependency management and auto-configuration for Micrometer, an application metrics facade that supports numerous monitoring systems.
    • Auditing: Once Spring Security is in play, Spring Boot Actuator has a flexible audit framework that publishes events (by default, “authentication success”, “failure” and “access denied” exceptions). This feature can be very useful for reporting and for implementing a lock-out policy based on authentication failures.
    • Http Tracing: HTTP Tracing can be enabled by providing a bean of type HttpTraceRepository in your application’s configuration. For convenience, Spring Boot offers an InMemoryHttpTraceRepository that stores traces for the last 100 request-response exchanges
    • Process Monitoring

Enable Actuator into Spring boot project

You can enable Actuator into Spring boot project by including below dependency.

//Gradle
org.springframework.boot:spring-boot-starter-actuator:2.3.1.RELEASE
//Maven
<dependency>
    <groupId>org.springframework.boot</groupId>
    <artifactId>spring-boot-starter-actuator</artifactId>
    <version>2.3.1.RELEASE</version>
</dependency>

Endpoint offer by Actuator

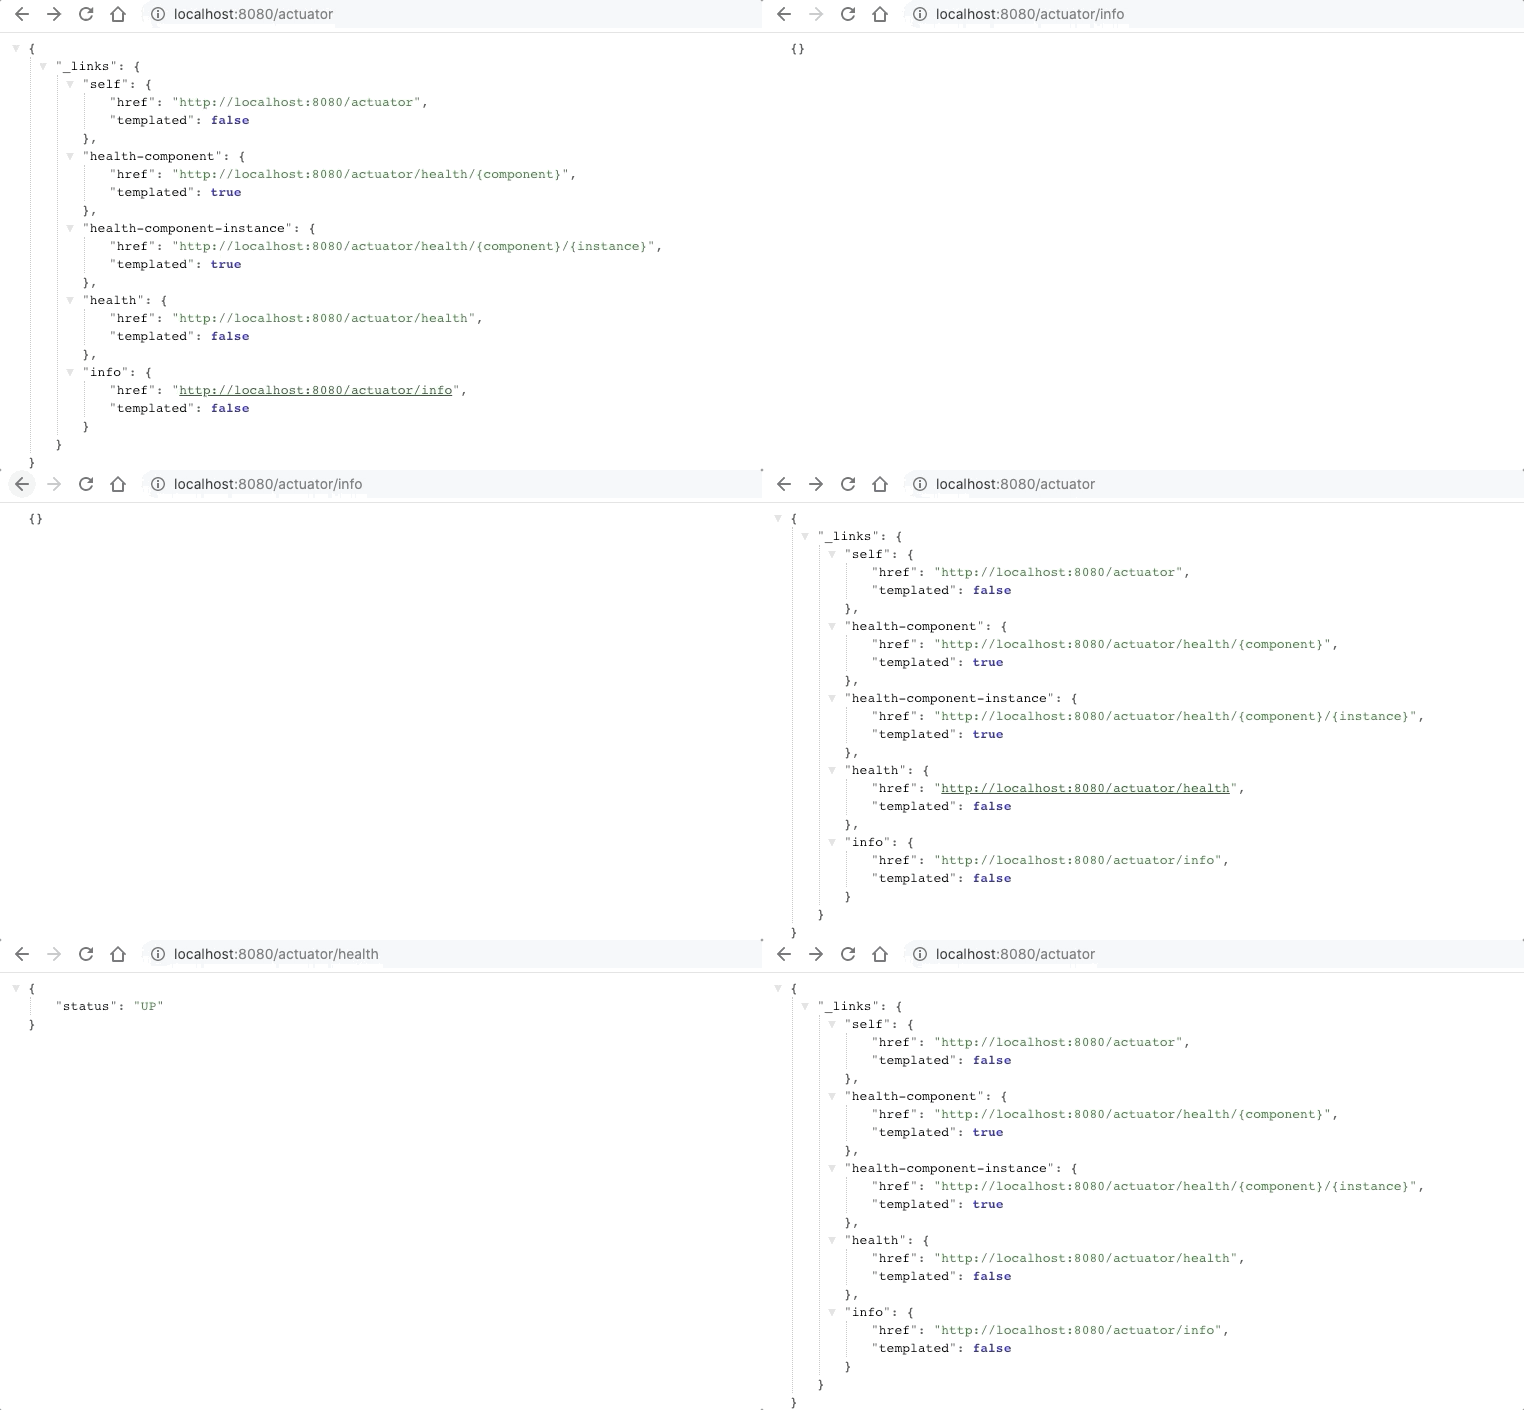
By default ‘health’ and ‘info’ endpoint are enabled

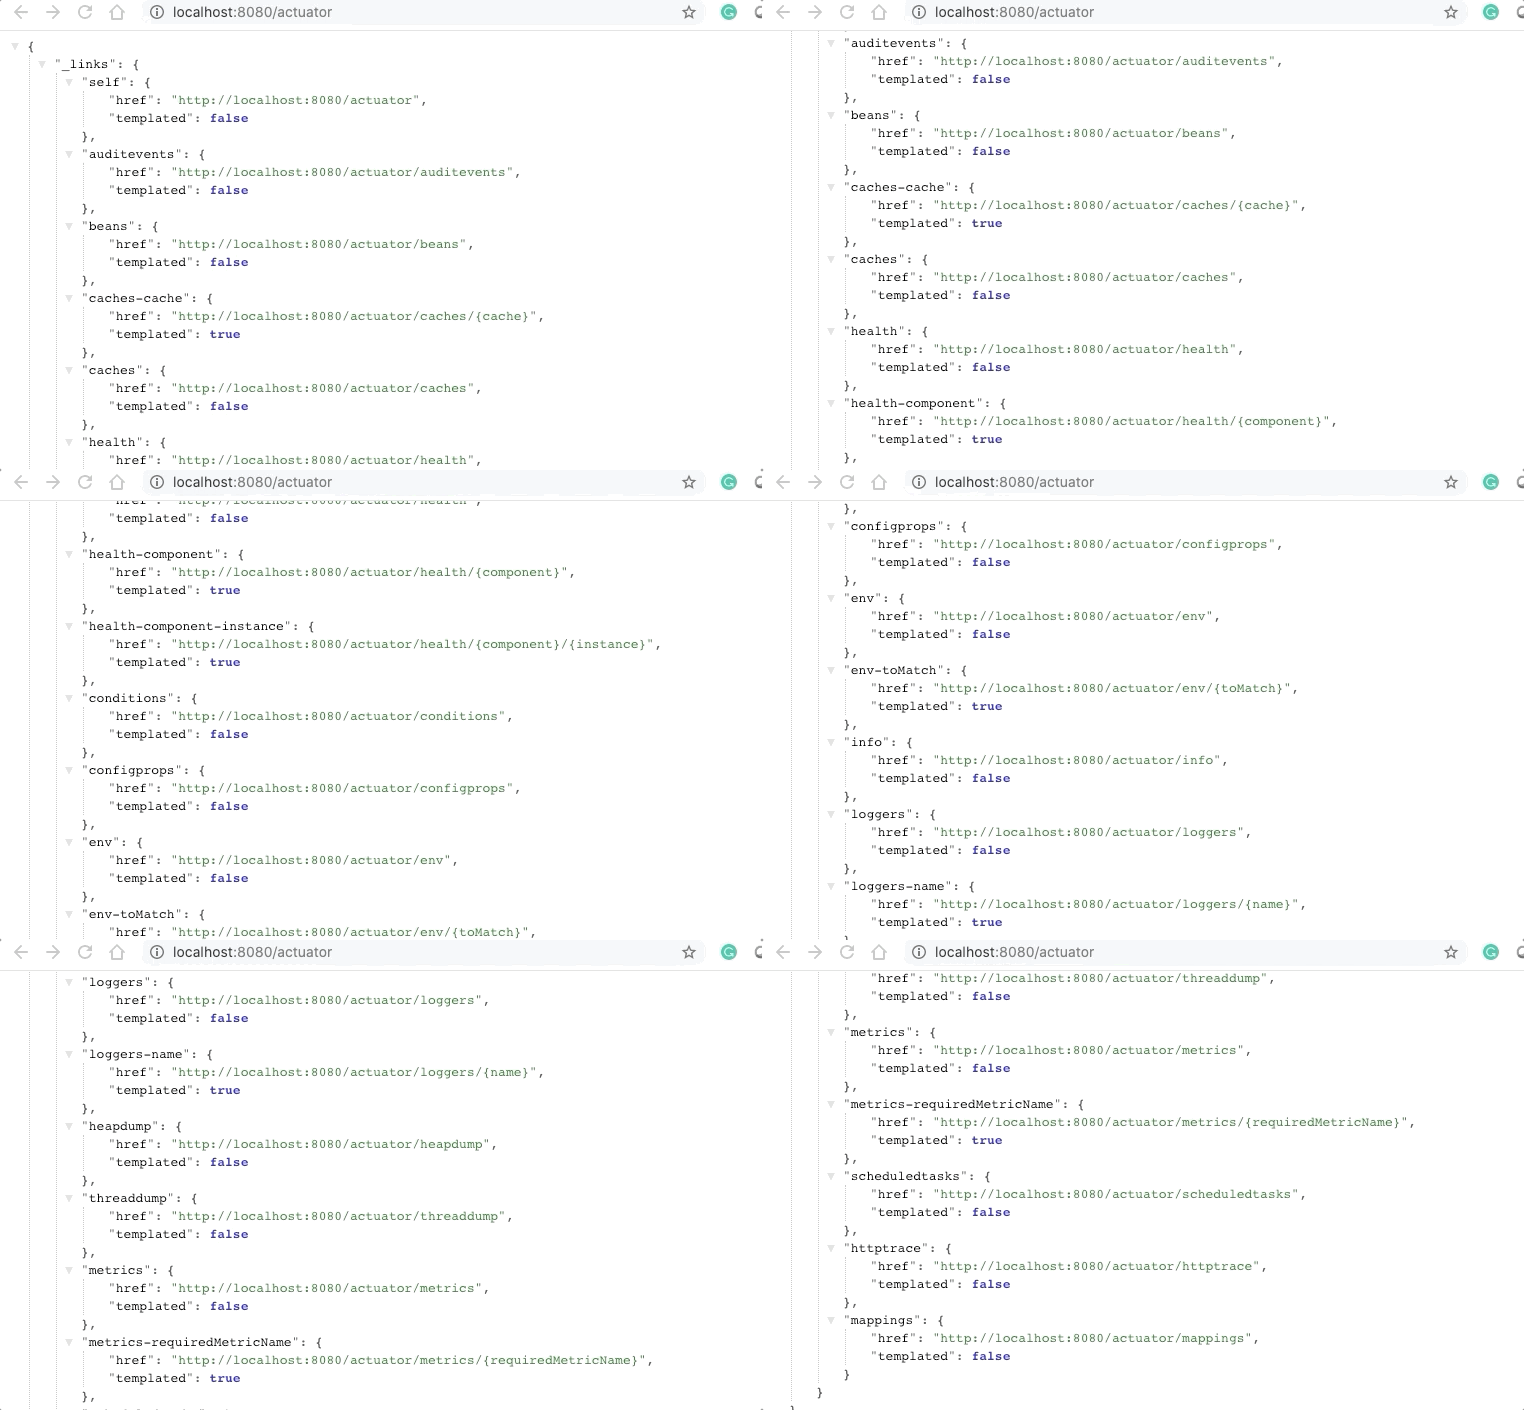
Default exposed endpoint

Other endpoints are sensitive and not advisable to expose to the production environment without security. As we are demonstrating, let’s expose all the APIs.

management.endpoints.web.exposure.include=*

Include and Exclude Endpoint

Even you can include or exclude endpoint by defining below properties

# wild card to include/exclude all
management.endpoints.web.exposure.include=* 
management.endpoints.web.exposure.exclude=* 

# you can include specific properties like below
management.endpoints.web.exposure.include=env,beans
management.endpoints.web.exposure.exclude=heapdump

Customise management server address

You can customize the management server port, it will help you define the limited scope to the ports.

management.server.port=8081
management.server.address=127.0.0.1

Expose custom endpoint

Any methods annotated with @ReadOperation@WriteOperation, or @DeleteOperation are automatically exposed over JMX and HTTP. Even you can expose technology specific endpoint by using @JmxEndpoint or @WebEndpoint.

Here i’m share you example for exposing endpoint using Spring boot 2.x

import org.springframework.boot.actuate.endpoint.annotation.ReadOperation;
import org.springframework.stereotype.Component;

@Component
@org.springframework.boot.actuate.endpoint.annotation.Endpoint(id = "say-hello")
public class Endpoint {

    @ReadOperation
    public String sayHello()
    {
        return "Hello World";
    }

}

Summary : Spring boot actuator is one of the best libraries you can add in your application to enable production-ready features in less effort. it offers key features that can be used in day to day production support.

Featured

Secure properties with spring cloud config

Overview: Earlier post I was demonstrating basic of spring cloud config. Now in this post, we will see how we can use secure properties in the spring cloud config. Before continuing on this, I recommend you to first go through the previous post.

Secure properties: Almost every application has some kind of configuration that can’t be exposable, some are very sensitive and should be limited access. we generally pronounce it secure properties. 

There are multiple ways you can secure your properties like using Cerberus, Hashicorp vault with consul backend, Cyberark password vault, and aim, confidant, Credstash etc. Here we are going to use the simplest way that may not as powerful as the above tools but secure and very easy to use.

Let’s implement this, in a sample code,

First, generate a key store. assuming you are aware of keytool.

keytool -genkeypair -alias mytestkey -keyalg RSA \ -dname "CN=Web Server,OU=Unit,O=Test,L=City,S=State,C=IN" \ -keypass changeme -keystore server.jks -storepass testPassword

Then place server.jks to resource folder in cloud config server project, after that edit bootstrap.properties(or .yaml). and add below properties.

Properties Description
encrypt.keyStore.locationContains a resource(.jks file) location
encrypt.keyStore.passwordHolds the password that unlocks the keystore
encrypt.keyStore.aliasIdentifies which key in the store to use
encrypt.keyStore.secret secret to encrypt or decrypt

e.g

encrypt.keyStore.location=server.jks encrypt.keyStore.password=testPassword encrypt.keyStore.alias=mytestkey encrypt.keyStore.secret=changeme

That’s it and now restart config server. 

There is encryption and decryption endpoint expose by config server. 

Let’s take a simple example, where we will try to encrypt and decrypt ‘testKey’.

#curl localhost:8888/encrypt --data-urlencode testKey

output:

AQAYqm8ax79kPFGT0sOvV8i8uN0GDLsToULmflVNYKf95bpyAKLIV4eCFVdNJpgb7SyS808a3uTjvQBj1SrIwFlQktRpln8ykpWUG3NdPM6aPf5k4yRhNkG43S5lCckmyLTH8CIzoSSFQeKoFuk4zPiAPTMchTP9qtAYG2EwbdWU1/a9xqoDJb9OQbSsEr0wp2Ud+HlG02NGF2qmhxL7kW5BJxTsGdZG2J8qwhkPYreYF6UQlehmheWCAJBzfBw4peT9LOxi7rA0sHD78xle7Bahziyc+WOETADloKfSowERNY5FCOe4/ywhcHpJuCk+6NPok3KVI+jMTXdSpqMmfxBNc764hHjlhpablwNcRPDv8XGCdstdy4Esb9/eXTZgh0g=

#curl localhost:8888/decrypt --data-urlencode AQAYqm8ax79kPFGT0sOvV8i8uN0GDLsToULmflVNYKf95bpyAKLIV4eCFVdNJpgb7SyS808a3uTjvQBj1SrIwFlQktRpln8ykpWUG3NdPM6aPf5k4yRhNkG43S5lCckmyLTH8CIzoSSFQeKoFuk4zPiAPTMchTP9qtAYG2EwbdWU1/a9xqoDJb9OQbSsEr0wp2Ud+HlG02NGF2qmhxL7kW5BJxTsGdZG2J8qwhkPYreYF6UQlehmheWCAJBzfBw4peT9LOxi7rA0sHD78xle7Bahziyc+WOETADloKfSowERNY5FCOe4/ywhcHpJuCk+6NPok3KVI+jMTXdSpqMmfxBNc764hHjlhpablwNcRPDv8XGCdstdy4Esb9/eXTZgh0g=

output:

testKey

As our keystore file containing public and private key so we can able to encrypt and decrypt properties.

In the case of config client, we do not have to do any extra step except below one, whenever we use encrypted property that has to start with ‘{cipher}’, for example

user.password={cipher}5lCckmyLTH8CIzoSSFQeKoFuk4zPiAPTMchTP9qtA

Caution: encrypted data should not be within single or double quotes.

In a case when a client wants to decrypt configuration locally

First,

If you want to encrypt and decrypt endpoint not work, Then comment all properties that start with encrypt.* and include the new line as below

spring.cloud.config.server.encrypt.enabled=false

Include keystore(.jks) file in client project and update below properties in bootstrap.properties(or .yaml) file

encrypt.keyStore.location=server.jks
encrypt.keyStore.password=testPassword
encrypt.keyStore.alias=mytestkey
encrypt.keyStore.secret=changeme

That’s all, now client project not going to connect with the server to decrypt properties.

Summary: We can secure our external properties using spring cloud config in fewer efforts, That may easily fulfill small or mid-scale project requirement.

Hope you like this 🙂

Featured

Spring cloud config

Overview: In this tutorial, we will cover the basics of Spring cloud config server and client, where you will set up your cloud config server and access configuration through client services.

What is Spring cloud config?

Spring cloud config provides server and client side support for externalized configuration a distributed system.

Why Spring cloud config?

External configuration is the basic need of almost any application. Now we are leaving in the microservices world, that need external configuration more often. Almost every individual application has some external and dynamic properties that keep updating based on the environment or some period of time.  In case of the massive size of services, it is hard to manage or left with creating a custom solution for it.

The dilemma is how we can make our application to adopt dynamic changes more often without investing time into it and with zero downtime. Here spring cloud config comes into the picture. It will help a user to manage their external properties from multiple sources like git, local file system etc. Transfer data into encrypted form and lot more.

How it works?

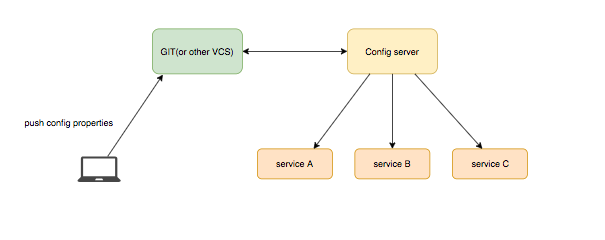
Screen Shot 2018-08-26 at 9.22.06 PM.png

Above diagram, you can see multiple services that get configuration from config server where config server sync with GIT or any other VCS to get new changes.

Let’s create a simple application, that will take a message from the config server and return through the endpoint.

Implementation of spring cloud config server:

Now I’m going to visit  spring initializer page to generate demo project, where I’ve included dependencies of spring ‘web’ and ‘config server’.

Once project imported into IDE, enable config server with ‘@EnableConfigServer’ annotation

@SpringBootApplication
@EnableConfigServer
public class DemoApplication {

   public static void main(String[] args) {
      SpringApplication.run(DemoApplication.class, args);
   }
}

In this example, I’m using local git  for demo purpose

#mkdir cloud-config
#git init
#touch config-client-demo.properties
#vi config-client-demo.properties 
message=Hello World
//wq (write and quite vi editor)
#git add config-client-demo.properties
#git commit -m "initial config"

By default, config server starts on port 8080 as spring boot application.

Here is config server application.properties

server.port=8888
spring.cloud.config.server.git.uri=${HOME}/Desktop/cloud-config

server.port: We use this property to define server port if you do not define it will set 8080 as a default port. Here I’m using the same machine for client and server so one of the port needs to be updated.

spirng.cloud.config.server.git.uri: We define this property to fetch configuration detail from git repository.

Implementation of client application:

Now I’m again going to generate a template application using spring initializer where included ‘web’, ‘client config’ and ‘actuator’ as dependencies. Here ‘actuator’ help us to refresh configuration.

Below is message controller that return message and that message came from config properties, you will notice @RefreshScope annotation that helps to refresh configuration.

@RestController
@RefreshScope
public class MessageRestController {

    @Value("${message}")
    private String message;

    @GetMapping("/message")
    String getMessage() {
        return this.message;
    }
}

Then rename your ‘applcation.properties‘ file to ‘bootstrap.properties‘ and include below config,  I’ve defined application name(name of application should accurate to fetch specific data), Configuration URI(which your config server URL that holds properties details) and expose all actuator endpoint that by default disabled

spring.application.name=config-client-demo
spring.cloud.config.uri=http://localhost:8888

management.endpoints.web.exposure.include=*

spring.application.name: Accurate name of the configuration file that defined on config server.

spring.cloud.config.uri: Base url of config server

management.endpoints.web.exposure.include: By default actuator’s most features are disabled so use a wildcard to enable all. That actually not needed in case of production.

Run your application and you will see below message.

GET http://localhost:8080/message

Response :
Hello world

Let’s update the properties file, I’m going to update ‘Hello World’ to ‘Hello Test’

#vi config-client-demo.properties
message= Hello Test
...
#git add config-client-demo.properties
#git commit -m "update message"
//Once file updated then 'refresh' configuration

Once you included the @RefreshScope annotation that will expose endpoint for you to refresh application, check below.

POST http://localhost:8080/actuator/refresh

Now again hit your message API

GET http://localhost:8080/message
Response:
Hello Test

checkout example at git

Conclusion: We can use spring cloud config to any kind of application for external, distributed and centralized configuration server. There is no limitation of technology and programming languages. You can apply spring cloud config in other languages as well.

Hope you like this tutorial.


Featured

Getting started with MongoDB

mongodb_logo.jpg

Hello Everyone,

In this post, I am going to present some of the basic syntax and example of MongoDB to get started with it. For basic detail of NoSQL db visit this link.

What is MongoDB?

Mongo db is an open source, cross-platform NoSql database. It is a document-oriented db which is written in C++.

Mongo db stores its data on the filesystem. It stores all the data in BSON (Binary JSON). The format of BSON documents is very similar to the Object Oriented Programming. In MongoDB we can store complete information in one document rather than creating different tables for them and then define a relationship between them.

Let’s take a brief look at terms which mongo db uses to store the data:

  • Collections: You need to create collections in each Database. Each DB can contain multiple collections.
  • Documents: Each Collection contains multiple Documents.
  • Fields: Each Document contains multiple Fields.


Now get started with the commands:

Database:

  • Create db or Use db: There is no command to create a db in Mongo. Whenever we want to create a new db use following command.
    • Syntax: use <dbname>
    • Example: use customerdb
  • Show current db : This is very simple and small command
    • Syntax: db
  • Show db : This command will return the existing dbs only if it contains at least one collection.
    • Syntax: show dbs

At this time we did show dbs it will return only a default db. For this, we need to add a collection to it. We will see how to add collection in collection section. But for now, presenting an example:

    • Example: db.customer({first_name:”Robin”}
    • show dbs

Now we can see our db customerdb in the list.

  • Drop db: To drop database following is the command. Before deleting database first select the db.
    • Syntax: db.dropDatabase()
    • Example: use customerdb
      db.dropDatabase()

Collections

  • Create collection : Mongo db normally we do not need to create collection explicitly. When we write a command to insert the document it will create the collection if does not exist. But there is a way to create collection explicitly an define it as expected:
    • Syntax: db.createCollection(<collectionName>, option)
      db.createCollection(<name>, { capped: <boolean>,
      autoIndexId: <boolean>,
      size: <number>,
      max: <number>,
      storageEngine: <document>,
      validator: <document>,
      validationLevel: <string>,
      validationAction: <string>,
      indexOptionDefaults: <document>,
      viewOn: <string>,
      pipeline: <pipeline>,
      collation: <document> } )
    • Example: db.createCollection(customer)

Collection name’s type is String and option type is Document.
Some of the important fields I am describing below:

Field(optional) Type Description
capped boolean If it sets to true it creates capped collection. For capped collection we need to define the size as well.
size number It defines the size of the capped collection. If the documents size reached to its limit then on each insert mongo db started deleting the old entries.
max number This defines the max size of capped collection. If the size is defined less then max size mongo db will start deleting the old document. So we need to ensure that max size is always less then size.
autoIndexId boolean It automatically creates index on id.


  • Drop Collection: We can drop a collection by using the following index but before dropping any collection we should be in the same db.
    • Syntax: db.<collectionName>.drop()
    • Example: use customerdb
      db.customer.drop()

CRUD Operations:

Mongo db provides very flexibility for CRUD operations. We can insert or update document on the fly.

  • Insert Document:
    • Syntax: db.<collectionName>.insert(<documents>)
    • Example:  db.customer.insert([{first_name:”Robin”, last_name:”Desosa”}, {first_name:“Kanika”, last_name:”Bhatnagar”},{first_name:”Rakesh”, last_name:”Sharma”, gender:”male”}]);

In the above example we are adding 3 document, first 2 are having the same fields but the third document has an additional field gender. Mongo db provides a functionality to insert the non structural data.
When you insert a document mongo db will automatically create a unique Id for each document.

  • Update Document:
    • Syntax: db.<collectionName>.update({<documentIdentifier>}, {$set:{<update value>}})
    • Example: db.customer.update({first_name:”Robin”},  {$set:{gender:”male”}});
      db.customer.update({first_name:”Kanika”},  {$set:{gender:”female”}});db.customer.update({first_name:”Rakesh”}, {$set:{age:”25”}})The above example will add a new field in corresponding document.
  • Update or Insert: Upsert command updates the document if it already exists or inserts a new one.
    • Syntax: db.<collectionName>.upsert({<docIdentifier>}, {<document>}, {upsert:true})
    • Example: db.customer({first_name:”Amita”}, {first_name:” Amita”, last_name:”Jain”, gender:”female”}, {upsert: true});
  • Rename Field in Document: We can rename field of a specific document by using $rename in update command.
    • Syntax: db.<collectionName>. update({<documentIdentifier>}, {$rename:{<update value>}})
    • Example: db.customer.update({first_name:”Rakesh”}, {$rename:{“gender”:”sex”}});After this we renamed the gender field to sex only for the document whose first_name is “Rakesh”.
  • Remove a field: To remove a field $unset needs to be used in update command.
    • Syntax: db.<collectionName>.update({<documentIdentifier >}, {$unset:{<field:1>}})
    • Example: Db.customer.update({first_name:”Rakesh”}, {$unset:{age:1}});
  • Remove Document:
    • Syntax: db.<collectionName>.remove({<documentIdentifier >})
    • Example: db.customer.remove({first_name:”Amita”});
      (If we have multiple entries with first_name Amita and want to remove 1.)
      db.customer.remove({first_name:”Amita”}, {justOne:true});
  • Find Document: We can find the document in collection by using following command. The output of that command is an object in json form.
    • Syntax: db.<collectionName>.find()
    • Example: db.customer.find();

The output of the above command will be all the json object stored in that collection.
To see it in a formatted way like each object and field in new line we can use pretty on find.

Example: db.customer.find().pretty();

  • Find Specific: By passing the documentIdentifier value in find method.
    • Syntax: db.<collectionName>.find({<documentIdentifier >})
    • Example: db.customer.find({first_name:”Kanika”});
  • Or condition: 
    • Example: db.customer.find({$or:[{first_name:”Kanika”}, {first_name:”Robin”}]});

In the above example we have a document in find as parameter, and in that document we have give an array of first_name. $or is defining the operation which is going to be performed on the array.

  • Greater than, Less than: We can directly jump on the example of the greater than and less than.

Example:

  • db.customer.find({age:{$gt:26}});
    In the above example $gt defines that > operation need to be perform on age. It will find and print all the documents who has this field age and age >26.
  • db.customer.find({age:{$lt:26}});
    In the same way this $lt will help us to find all documents which have age field and age < 26.
  • db.customer.find({age:{$gte:26}});
    We can perform >= or <= operations as well by using $gte and $lte.

Following are some more example on features provided by Mongo db:

  • Sort:
    • db.customer.find().sort({first_name:1}); //descending order
      db.customer.find().sort({first_name:-1}); //ascending order
  • Count:
    • db.customer.find().count();
  • ForEach:
    • db.customer.find().forEach(function(doc){print(“Customer Name:”+ doc.first_name)});

These all are the basic syntax for getting started with MongoDb.


Java’s Time Machine: A Guided Tour Through 12 Years of Change -1

Hi Everyone,

I am thrilled to take you on an exhilarating journey through the remarkable advancements spanning Java 9 to 21.

Note – Here I have highlighted only important features and skipped few features that has minor improvement across multiple versions.

Let’s drive in.

Java 9

The modular system allows for greater flexibility in building smaller, manageable modules. Each module includes related packages, necessary resources, and metadata. Developers can specify which packages are public and accessible to other modules, and which ones should remain private.

Here are some benefits of the module system:

  • Strong encapsulation: Modules can declare which packages and resources they export and require from other modules, preventing conflicts in code and making application development more manageable.
  • Improved security: Modules can restrict access to resources, improving the security of Java applications.
  • Reduced classpath complexity: The module system simplifies the management and resolution of module dependencies, thus reducing classpath complexity.
  • Reduced application size: The module system allows developers to package only the modules they need, which ultimately reduces the size of Java applications.

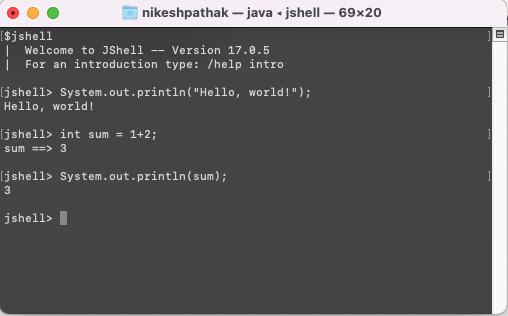
JShell: Java read-eval-print loop (REPL), which was introduced in Java 9, is an interactive tool that lets you evaluate Java declarations, statements and expressions in real-time. It’s an excellent resource for learning Java, prototyping Java code, and debugging Java applications.

Using JShell is easy – just launch it from the command line and start writing Java code. JShell will immediately evaluate the code as you type and display the results. You can even test the following Java statements using JShell:

JShell is a powerful and versatile tool for Java developers. It can be used for a variety of tasks, including:

  • Learning the Java programming language
  • Prototyping Java code
  • Debugging Java applications
  • Exploring new Java features
  • Teaching Java to others

HTTP/2 Client: Java 9 introduces a new HTTP/2 Client API that supports the latest version of the HTTP protocol, offering improved performance, reduced overhead, and improved security for HTTP communication. The API is easy to use and provides asynchronous support, enabling HTTP requests without blocking the main thread of the application. It also supports multiple protocols, making it a suitable choice for applications that need to support various protocols.

To use the Java 9 HTTP/2 Client, you first need to import the jdk.incubator.httpclient module. Once you have imported the module, you can create a new HttpClient object. You can then use the HttpClient object to send HTTP requests and receive HTTP responses.

Here is an example of how to use the Java 9 HTTP/2 Client to send a simple HTTP GET request:

import jdk.incubator.httpclient.HttpClient;
import jdk.incubator.httpclient.HttpResponse;

public class Main {
    public static void main(String[] args) throws Exception {
        HttpClient client = HttpClient.newHttpClient();
        HttpResponse response = client.send(
                new HttpRequest.Builder()
                        .uri(URI.create("https://nikeshpathak.com"))
                        .method("GET")
                        .build(),
                HttpResponse.BodyHandlers.ofString());

        System.out.println(response.body());
    }
}

Try-With-Resources Improvement: Allowing effectively final variables to be used in try-with-resources.

Java 9’s Try-With-Resources Statement: Key Improvements

  • Resources can be declared outside the try block.
    • Prior to Java 9, resources had to be declared inside the try block. Now, Java 9 permits resources to be defined outside the try block, allowing for more readable and maintainable code.
  • Multiple resource types are supported.
    • In previous versions of Java, the try-with-resources statement could only be used with resources of the same type. The updated version supports multiple types of resources, making it simpler to implement the statement with complex code.
  • Suppressed exceptions are no longer an issue
    • In Java 8 and earlier, exceptions thrown by resources were suppressed by the try-with-resources statement. However, in Java 9, these exceptions are no longer suppressed, leading to more efficient debugging.
import java.io.BufferedReader;
import java.io.FileReader;
import java.io.IOException;

public class Main {
    public static void main(String[] args) throws IOException {
        // Declare the resources outside the try block.
        BufferedReader reader = new BufferedReader(new FileReader("myfile.txt"));

        // Use the improved try-with-resources statement to close the reader.
        try (reader) {
            String line;
            while ((line = reader.readLine()) != null) {
                System.out.println(line);
            }
        }
    }
}

Private method in interface. –
Java 9 introduced the ability to declare private methods in interfaces. This feature allows interface designers to encapsulate common code and prevent implementers from overriding or modifying that code.

Java 9 Javadoc improvement:

  • Support for HTML5: Javadoc now generates documentation in HTML5 format by default. This allows you to use modern HTML5 features in your documentation, such as CSS3 and JavaScript.
  • Improved code highlighting: Javadoc now uses a new code highlighter that provides better support for Java 9 features, such as modules and private methods in interfaces.
  • Support for linking to Java modules: Javadoc now supports linking to Java modules. This allows you to create documentation that is more modular and easier to navigate.
  • Support for generating documentation for private methods: Javadoc now supports generating documentation for private methods. This can be useful for documenting implementation details that are not exposed to the public API.
  • Improved support for generating documentation for nested classes: Javadoc now provides better support for generating documentation for nested classes. This makes it easier to document the relationships between nested classes and their outer classes.

Java 10

Local-Variable Type Inference (var): Java 10 introduced local-variable type inference, also known as var, which allows you to declare a local variable without specifying its type. The compiler will infer the type of the variable based on the value that is assigned to it.
example –

var myVariable = 10; // myVariable is inferred to be of type int
var myOtherVariable = "Hello, world!"; // myOtherVariable is inferred to be of type String

New APIs for process handling and file I/O: Java 10 introduced the following new APIs for process handling and file I/O:

Process handling: Java’s ProcessHandle class provides information about a running process, while the ProcessTree class represents a hierarchy of running processes. ProcessInfo class offers details about a process, including the command line and user ID. The Process#destroyForcibly() method terminates a process and its child processes.

File I/O: Java’s File Handling API has several useful classes and methods, including PathMatcher for matching file paths, WatchService for detecting file changes, and FileChannel methods like newByteChannel(), newInputStream(), newOutputStream(), and newMappedByteBuffer().

These new APIs provide a number of benefits, including:

  • Improved process handling: The new process handling APIs provide more information about running processes and make it easier to manage running processes.
  • More efficient file I/O: The new file I/O APIs provide more efficient ways to read and write files.
  • Support for new file system features: The new file I/O APIs support new file system features, such as watching for changes to files and directories.

Garbage Collector Interface: Java 10 introduced the Garbage Collector (GC) Interface, which is a new interface that allows garbage collectors to be plugged in and out of the Java Virtual Machine (JVM) at runtime. This makes it easier to develop and deploy new garbage collectors, as well as to switch between different garbage collectors depending on the needs of the application.

To use a different garbage collector, you can specify the garbage collector to use on the command line when you start the JVM. For example, to start the JVM using the ZGC, you would use the following command:

example –

java -XX:+UseZGC MyApplication

Java 11

HTTP Client Updates: Standardized the HTTP client API introduced in Java 9.

Local-Variable Syntax for Lambda Parameters: Similar to var, but for lambda expressions.

The local-variable syntax for lambda parameters in Java 11 is similar to the var keyword, but it is specifically for lambda expressions. It allows you to declare lambda parameters without specifying their type. The compiler will infer the type of the parameter based on the value that is assigned to it.

example –

(var a, var b) -> a + b; // a and b are inferred to be of type int

Nashorn JavaScript Engine Removal: The Nashorn JavaScript engine was removed in Java 11. This was done because Nashorn was deprecated in Java 9 and was not being actively maintained. The GraalVM JavaScript engine is now the recommended JavaScript engine for use with Java.

The GraalVM JavaScript engine is a more modern and performant JavaScript engine than Nashorn. It also supports a wider range of JavaScript features.

If you are using Nashorn in your Java code, you will need to migrate to the GraalVM JavaScript engine in order to continue using JavaScript in your Java applications.

Flight Recorder:JFR (Java Flight Recorder) was made available in this version without commercial license restrictions.

Java Flight Recorder (JFR) is a diagnostic and profiling tool that collects data about a running Java application. It is integrated into the Java Virtual Machine (JVM) and causes almost no performance overhead, so it can be used even in heavily loaded production environments.

JFR collects data about a variety of events, including:

  • Garbage collection
  • Memory allocation
  • CPU usage
  • I/O operations
  • Exception handling
  • Synchronization
  • Method execution

JFR can be used to troubleshoot performance problems, identify memory leaks, and optimize code. It can also be used to collect data about the overall behavior of a Java application.

JFR data is stored in a binary format called JFR flight recording. JFR flight recordings can be analyzed using the Java Mission Control (JMC) tool. JMC provides a variety of features for analyzing JFR data, including:

  • Timelines
  • Charts
  • Tables
  • Filters
  • Reports

JFR is a valuable tool for Java developers. It can be used to improve the performance, reliability, and scalability of Java applications.

Here are some of the benefits of using Java Flight Recorder:

  • Comprehensive data collection: JFR collects a wide range of data about a running Java application. This data can be used to diagnose performance problems, identify memory leaks, and optimize code.
  • Low overhead: JFR has a very low performance overhead, so it can be used even in heavily loaded production environments.
  • Easy to use: JFR is easy to use and configure. It can be used to start and stop recording data with a single command-line option.
  • Powerful analysis tools: JMC provides a variety of powerful tools for analyzing JFR data. This makes it easy to identify the root cause of performance problems and make the necessary changes to improve the performance of your application.

Overall, Java Flight Recorder is a powerful and versatile tool that can be used to improve the performance, reliability, and scalability of Java applications.

Nest-based access control: Nest-based access control (NAC) is a feature introduced in Java 11 that allows classes to access each other’s private members without the need for bridge methods. Bridge methods are automatically generated by the compiler when a nested class needs to access a private member of its enclosing class.

NAC simplifies the code generation process and eliminates the need for bridge methods, which can improve performance and reduce memory usage. It also makes it easier to develop and maintain modular code.

To use NAC, you simply need to declare the nested class within the enclosing class. The nested class will then be able to access the private members of its enclosing class without any restrictions.

Here is an example of NAC:

public class Outer {
    private int secret = 10;

    public class Inner {
        public void printSecret() {
            System.out.println(secret);
        }
    }
}

In this example, the Inner class is nested within the Outer class. The Inner class can access the secret variable of the Outer class even though it is private.


Dynamic class-file constant pool sharing: Java 11 introduced dynamic class-file constant pool sharing, which allows the Java Virtual Machine (JVM) to share constant pools between different classes. This can improve performance and reduce memory usage, especially for applications that load a large number of classes.

Prior to Java 11, each class had its own constant pool. This could lead to performance problems and increased memory usage, especially for applications that load a large number of classes.

With dynamic class-file constant pool sharing, the JVM can share constant pools between different classes. This is done by using a technique called constant pool deduplication.

Constant pool deduplication works by identifying identical constant pools in different classes. When the JVM finds two identical constant pools, it merges them into a single constant pool. This single constant pool is then shared by both classes.

Dynamic class-file constant pool sharing is a transparent feature. It does not require any changes to your Java code.

Here are some of the benefits of using dynamic class-file constant pool sharing:

  • Improved performance: Dynamic class-file constant pool sharing can improve performance by reducing the number of constant pools that need to be loaded into memory and by reducing the number of times that the JVM needs to search for constant values in the constant pool.
  • Reduced memory usage: Dynamic class-file constant pool sharing can reduce memory usage by reducing the amount of memory that is required to store constant pools.
  • No code changes required: Dynamic class-file constant pool sharing is a transparent feature. It does not require any changes to your Java code.

Java 12

Switch Expressions (Preview): Java 12 introduced switch expressions, which are a more concise and expressive way to write switch statements. Switch expressions can be used to return a value, which makes them more flexible than traditional switch statements.

To use a switch expression, you simply need to use the switch keyword followed by the expression that you want to evaluate. The cases of the switch expression are then listed after the expression.

Here is an example of a switch expression:

int number = 10;
String result = switch (number) {
    case 10:
        yield "Ten";
    case 20:
        yield "Twenty";
    default:
        yield "Other";
};

Compact Number Formatting: Java 12 introduced compact number formatting, which allows you to format numbers in a more concise way. Compact number formatting is useful for applications where space is limited, such as GUI components and mobile apps.

Compact number formatting works by replacing large numbers with their abbreviated forms. For example, the number 123,456,789 can be formatted as “123M” or “123 million”.

To use compact number formatting, you can use the CompactNumberFormat class. The CompactNumberFormat class provides a number of methods for formatting numbers in a compact way.

For example, the following code formats the number 123,456,789 as “123M”:

CompactNumberFormat formatter = CompactNumberFormat.getInstance();
String formattedNumber = formatter.format(123456789);
System.out.println(formattedNumber);

Raw String Literals (Preview): Java 12 introduced raw string literals, which allow you to create string literals without any escape sequences. This can make your code more concise and readable, especially when you are working with strings that contain a lot of escape sequences.

To create a raw string literal, you simply need to prefix the string literal with a backslash (\) followed by a single quote (‘). For example, the following string literal is a raw string literal:

String configuration = "\'
[database]
host = localhost
port = 3306
database = my_database
username = root
password = password
'";

JFR improvements

Java 12 introduced a number of improvements to Java Flight Recorder (JFR), including:

  • New JFR Security Events: Four new JFR Security Events were introduced: jdk.SecurityPropertyModification, jdk.TLSHandshake, jdk.X509Validation, and jdk.X509Certificate. These events can be used to track security-related activities in your application.
  • Improved JFR Configuration: A new interactive wizard was added to make it easier to create JFR configuration files. You can also now pass configuration values directly to the JFR command-line tool.
  • Support for ZGC: JFR now supports Z Garbage Collector (ZGC), which is a new garbage collection algorithm that was introduced in Java 11.
  • Improved JFR Performance: A number of performance improvements were made to JFR, including reducing the overhead of recording events and improving the performance of the JFR command-line tool.

New APIs for XML and JSON processing

Java 12 introduced the following new APIs for XML and JSON processing:

  • XML:
    • XMLStreamWriter class: This class provides a streaming interface for writing XML data.
    • XMLStreamReader class: This class provides a streaming interface for reading XML data.
    • XMLParserFactory class: This class provides a factory for creating XML parsers.
  • JSON:
    • JSONDecoder class: This class decodes JSON data into Java objects.
    • JSONEncoder class: This class encodes Java objects into JSON data.
    • JSONParserFactory class: This class provides a factory for creating JSON parsers.

Java 13

Text Blocks (Preview): Java 13 introduced text blocks, which are a new way to write multiline string literals. Text blocks are more concise and readable than traditional multiline string literals, and they also make it easier to avoid escape sequences.

To create a text block, you simply need to start the string literal with three double quotes (“””) and end it with another three double quotes. For example, the following code shows how to create a text block:

String textBlock = """
This is a text block.
and can avoid escape sequences.
"""";

New APIs for dynamic class loading and file system access

  • Dynamic class loading:
    • DynamicClassLoader class: This class provides a more flexible and powerful way to load classes dynamically.
    • ModuleReference class: This class represents a reference to a module.
    • ModuleFinder interface: This interface provides a way to find modules.
  • File system access:
    • Path interface: This interface represents a path to a file or directory.
    • FileSystem interface: This interface represents a file system.
    • FileSystems class: This class provides a factory for creating file systems.

Java 14

Pattern Matching (Preview): Java 14 introduced pattern matching, which is a new way to compare and extract data from objects. Pattern matching is more concise and expressive than traditional conditional statements, and it can also help to reduce errors.

To use pattern matching, you simply need to use the switch statement followed by a pattern expression. The pattern expression can be any valid Java expression, such as a variable, a literal value, or a method call.

Here are some examples of pattern matching in Java:

// Match a nested pattern
Point point = new Point(10, 20);
String quadrant = switch (point) {
  case (0, 0):
    yield "Origin";
  case (x, y) where x > 0 && y > 0:
    yield "Quadrant I";
  case (x, y) where x < 0 && y > 0:
    yield "Quadrant II";
  case (x, y) where x < 0 && y < 0:
    yield "Quadrant III";
  case (x, y) where x > 0 && y < 0:
    yield "Quadrant IV";
  default:
    yield "Unknown";
};
//-----------------------------
// Match a regular expression
String name = "John Doe";
String title = switch (name) {
  case /\w+ \w+/:
    yield "Mr. " + name;
  default:
    yield "Unknown";
};
//---------------------------------
// Match a simple type
int number = 10;
String result = switch (number) {
  case 10:
    yield "Ten";
  case 20:
    yield "Twenty";
  default:
    yield "Other";
};

Records (Preview): Java 14 introduced records, which are a new type of class that is designed to represent immutable data. Records are simpler and more concise than traditional classes, and they can be used to represent a wide variety of data types, such as person objects, product objects, and address objects.

Records are declared using the record keyword. The record keyword takes the name of the record and the names of its fields as its arguments. For example

// Create a new Person record
Person person = Person.of("John Doe", 30);

// Get the person's name
String name = person.name();

// Get the person's age
int age = person.age();

// Check if two Person records are equal
boolean equal = person.equals(new Person("John Doe", 30));

// Sort a list of Person records
List<Person> people = List.of(
    Person.of("John Doe", 30),
    Person.of("Jane Doe", 25)
);
people.sort(Comparator.comparing(Person::name));

Sealed classes: Java 14 introduced sealed classes, which are a new type of class that can restrict its subclasses. Sealed classes are useful for modeling domain concepts and improving the security of libraries.

To seal a class, you simply need to add the sealed keyword to its declaration. Then, you can specify the permitted subclasses using the permits clause. For example, the following code declares a sealed class called Shape:

sealed class Shape permits Circle, Square, Rectangle {}

This code specifies that the only permitted subclasses of the Shape class are the Circle, Square, and Rectangle classes.

Sealed classes have a number of benefits, including:

  • Improved domain modeling: Sealed classes can help you to improve your domain modeling by making it clear which classes are allowed to extend a given class.
  • Reduced coupling: Sealed classes can help to reduce coupling between your classes by making it clear which classes are allowed to depend on each other.
  • Improved security: Sealed classes can help to improve the security of your libraries by making it more difficult for attackers to introduce malicious subclasses.

Here are some examples of how to use sealed classes in Java:

// Create a new Shape object
Shape shape = new Square();

// Check if the shape is a Circle
boolean isCircle = shape instanceof Circle;

// Check if the shape is a Square
boolean isSquare = shape instanceof Square;

// Create a new subclass of the Shape class
public class Triangle extends Shape {} // This will not compile, because the Shape class is sealed

// Create a new permitted subclass of the Shape class
public class Triangle extends Shape permits Circle {} // This will compile, because the Shape class permits the Triangle subclass

Continue to the part-2

Thanks for reading. you can connect me @linkedin

Service discovery with Eureka

Eureka is REST based application service, That primarily used for service register and middle-tier api load balancing.

Why Eureka required ?

There is many reason where we can consider eureka
– Service registry
– Client side load balancing
– Peer to peer connectivity between server
– Maintain self preservation state in case network collapse at certain threshold
– Scope of customisation
– Mid-tier load balancing

How Eureka work?

Eureka come up with two components. Eureka client and Eureka server. Any application who doing service discovery on Eureka server should have Eureka client enabled. actually if we complete server setup there is three application that came into picture –

  • Eureka server – that hold the client details and do mid-tier load balancing
  • Application client – That is Eureka client that called to other services.
  • Application services – That is also Eureka client but called by other services.

Let’s understand with example – Suppose we have web-application that have two services. one web client that hold front end implementation. and other backend services that hold business logics. here both backend and frontend is kind of client for Eureka server and both add eureka client component so they can send their heart bit to eureka server. and In this scenarios eureka server maintain registry of both application(web client and backend services). also web client not required to directly called to backend services. that can call to eureka server. where eureka server redirect their call to specific instance as per availability. Here Eureka server use Round-Robin algorithm to redirect request of client.

Eureka server client communication and stats ?

Register – Eureka client registers the information about the running instance to the Eureka server.
Renew – Eureka client needs to renew the lease by sending heartbeats every 30 seconds. The renewal informs the Eureka server that the instance is still alive. If the server hasn’t seen a renewal for 90 seconds, it removes the instance out of its registry. It is advisable not to change the renewal interval since the server uses that information to determine if there is a wide spread problem with the client to server communication.
Fetch registry – Eureka clients fetches the registry information from the server and caches it locally. After that, the clients use that information to find other services
Cancel – Eureka client sends a cancel request to Eureka server on shutdown. This removes the instance from the server’s instance registry thereby effectively taking the instance out of traffic.
Time lag– All operations from Eureka client may take some time to reflect in the Eureka servers and subsequently in other Eureka clients. This is because of the caching of the payload on the eureka server which is refreshed periodically to reflect new information. Eureka clients also fetch deltas periodically. Hence, it may take up to 2 mins for changes to propagate to all Eureka clients.

Let’s go through example ,
Here i’m going create these applications.
1. Eureka server – that will register all the services.
2. Application Service – This will backend application called by client but its also registered with Eureka as client
3. Application Client – this will be client application that Called Application services via eureka server.

Eureka Server

I would suggest you to visit – Spring initialiser and generate Spring application from there and don’t forget to include Eureka server dependencies. for more details please visit this page to know more details.

Once you imported the project into your IDE. then go to resource folder and open application.properties/yml files. defined below bare minimum properties to make your server up and visible.

//YAML format
server:
    port: 8761

eureka:
    instance:
        hostname: localhost
    client:
        fetch-registry: false
        register-with-eureka: false
        serviceUrl:
            defaultZone: http://${eureka.instance.hostname}:${server.port}/eureka/
spring:
    freemarker:
        prefer-file-system-access: false
        template-loader-path: classpath:/templates/
-------------------------------------------------------------------------
OR
// properties format

eureka.instance.hostname=localhost
eureka.client.fetch-registry=false
eureka.client.register-with-eureka=false
eureka.client.serviceUrl.defaultZone=http://${eureka.instance.hostname}:${server.port}/eureka/
server.port=8761
spring.freemarker.prefer-file-system-access=false
spring.freemarker.template-loader-path=classpath:/templates/

server.port – Server port details, Here we require to define unique port no.
eureka.client.fetch-registry – mark this as false so it will not try to fetch registry details as client
eureka.client.register-with-eureka – So it will not register them self
eureka.client.serviceUrl.defaultZone – Define default zone address for the client, so client connect at this address
spring.freemarker.template-loader-path – as UI page is by default included with Eureka server. so pointed template path in class path incase if by default not detected
spring.freemarker.prefer-file-system-access – there is no need to read local file system.

Now open application.java files and enable Eureka server using @EnableEurekaServer annotation.Then start server

@EnableEurekaServer
@SpringBootApplication
public class EurekaserverApplication {

	public static void main(String[] args) {
		SpringApplication.run(EurekaserverApplication.class, args);
	}
}

Once server up, now visit on this link – http://localhost:8761, you will see similar dashboard as below,

Eureka dashboard

Here there is no application registered with Eureka server now. Lets create Eureka Client.

Eureka Client

Same as Eureka server we require to generate project from Spring Initialiser , Once project generated and open into IDE, we require to edit application.properties/yml file.

spring:
  application:
    name: eureka-service-client

server:
  port: 8082

eureka:
  client:
    serviceUrl:
      defaultZone: http://localhost:8761/eureka
---------------------------------------------------------------------
OR
eureka.client.serviceUrl.defaultZone=http://localhost:8761/eureka
server.port=8082
spring.application.name=eureka-service-client

eureka.client.serviceUrl.defaultZone – Default zone for eureka client to register
server.port – server port
spring.application.name – named the application the same will be visible to eureka server

Open application.java files and @EnableDiscoveryClient.

@SpringBootApplication
@EnableDiscoveryClient
public class EurekaclientApplication {

	public static void main(String[] args) {
		SpringApplication.run(EurekaclientApplication.class, args);
	}

}

Now start the client server and check on Eureka if they are visible.

Kafka: Kafka producer with SpringBoot

In my earlier article we have seen how to produce and consume messages using terminal.

In this post i’ll show you how we can produce events/message using springboot project.

Spring also provided support for Kafka . Spring Kafka brings the simple and typical Spring template programming model with a KafkaTemplate and Message-driven POJOs via @KafkaListener annotation.

Now without any further delay let’s start implementing.

Step 1: Start the Zookeeper and Kafka server on your local.

Step 2: Create a spring boot project with Kafka dependencies.

Create a spring boot project, and add below dependencies in your build.gradle / pom.xml

implementation group: 'org.springframework.kafka', name:'spring-kafka'
implementation group: 'org.apache.kafka', name: 'kafka-clients', version: '2.6.0'

Step 3: Application configuration

We will define bootstrap server and topic name in application.properties.

server.port=7000
kafka.bootstrap.server=localhost:9092
kafka.topic.name=greetings

Step 3: Configuring Topic

You can create a topic using the command prompt or using spring boot configuration as below:

@Configuration
public class TopicConfig {

    @Value(value = "${kafka.bootstrap.server}")
    private String bootstrapAddress;

    @Value(value = "${kafka.topic.name}")
    public String topic;

    @Bean
    public KafkaAdmin kafkaAdmin() {
        Map<String, Object> configs = new HashMap<>();
        configs.put(AdminClientConfig.BOOTSTRAP_SERVERS_CONFIG, bootstrapAddress);
        return new KafkaAdmin(configs);
    }

    @Bean
    public NewTopic topic1() {
        return new NewTopic(topic, 1, (short) 1);
    }

Step 4: Producer Configuration

In producer configuration we need ProducerFactory bean and a KafkaTemplate bean.

@Configuration
public class KafkaProducerConfig {

    @Value(value = "${kafka.bootstrap.server}")
    private String bootstrapAddress;


    @Bean
    public ProducerFactory<String, String> producerFactory() {
        Map<String, Object> configProps = new HashMap<>();
        configProps.put(
                ProducerConfig.BOOTSTRAP_SERVERS_CONFIG,
                bootstrapAddress);
        configProps.put(
                ProducerConfig.KEY_SERIALIZER_CLASS_CONFIG,
                StringSerializer.class);
        configProps.put(
                ProducerConfig.VALUE_SERIALIZER_CLASS_CONFIG,
                StringSerializer.class);
        return new DefaultKafkaProducerFactory<>(configProps);
    }

    @Bean
    public KafkaTemplate<String, String> kafkaTemplate() {
        return new KafkaTemplate<>(producerFactory());
    }

Step 5: Publishing messages

Let’s create a rest controller which will take messages as input and publish them to kafka topic.

@RestController
@RequestMapping("/greetings")
public class MessageController {


    @Autowired
    private KafkaTemplate<String, String> kafkaTemplate;

    @Value(value = "${kafka.topic.name}")
    public String topic;

    @GetMapping("/msg")
    public void sendMessage(@RequestParam String msg) {
        kafkaTemplate.send(topic, msg);
    }

Summery:

In this post I have shown you how to created a topic and publish messages to the topic from a spring-boot application.

Kafka: Publish and Consume messages

In my earlier posts, I have explained about Kafka and the how to install and run Kafka on your system.

Now we will see how to publish and consume messages in Kafka.

Step 1: Create a Topic

As we know in Kafka publisher publish messages to topic and Kafka will decides this message will be assigned to which partition in a topic.

So first we will create a topic named greetings. For this lets open a new command prompt and navigate to bin/windows folder. Then by using kafka-topic.bat we can create a topic.

Notice the bootstrap server port 9092. This is the default port of Kafka server.

$ kafka-topics.bat --create --topic greetings --bootstrap-server localhost:9092

So now we have successfully created the topic.

We can pass the –describe parameter to kafka-topic.bat to get the information about the topic.

$ kafka-topics.bat --describe --topic greetings --bootstrap-server localhost:9092

Step 2: Publish some events

Now let’s write some message or publish some event to the topic.

To do so open a new command prompt and navigate to bin/windows and type below command.

$ kafka-console-producer.bat --topic greetings --bootstrap-server localhost:9092

Then type the message you want to publish. By default each line you enter will trigger a separate event to the topic.

We can stop the publisher any time by pressing Ctrl + C.

Step 3: Consume events

Open an another terminal and by using kafka-console-consumer.bat you will be able to consume messages.

$ kafka-console-consumer.bat --topic greetings --from-beginning --bootstrap-server localhost:9092

Great 👏

Now you are publishing and consuming messages using Kafka.

Summery :

In this article we have demonstrate how you can create topic in Kafka and produce and consume messages by using Kafka’s producer and consumer console library.

Prev -> Kafka: Install and Run Apache Kafka on windows

Kafka: Install and Run Apache Kafka on windows

Install Apache Kafka on Windows

STEP 1: Install JAVA SDK >8

For this we need java-jdk installed on our system.

STEP 2: Download and Install Apache Kafka binaries

You can download the Apache Kafka binaries from Apache kafka official page:

https://kafka.apache.org/downloads

STEP 3: Extract the binary

Extract the binary to some folder. Create a ‘data‘ folder at bin level.

Inside data folder create zookeeper and kafka folder.

STEP 4: Update configuration value

Update zookeeper data directory path in “config/zookeeper.Properties” configuration file.

With the zookeeper folder path that you have created in data.

Update Apache Kafka log file path in “config/server.properties” configuration file.

STEP 5:  Start Zookeeper

Now we will start zookeeper from command prompt. Go to kafka bin\windows and execute zookeeper-server-start.bat command with config/zookeeper.Properties configuration file.

Here we are using default properties that already bundled with kafka bindary and persist into the config folder. later we can update this according to our uses.

To validate if zookeeper starts successfully check for below logs.

STEP 6:  Start Apache Kafka

Finally we will start Apache Kafka from command prompt just in the same way we started zookeeper. Open an another command prompt, run kafka-server-start.bat command with kafka config/server.properties configuration file.

Summery:

To proceed with kafka you need install and run kafka and zookeeper server on your machine. with the above steps.

Next-> Kafka: Publish and Consume messages

Prev-> Kafka: Introduction to Kafka

Kafka: Introduction to Kafka

In this world of data where things and systems started depending on data, it is very important to get the right data at a right time to get the most of it. In this a great architecture of data streaming – “Apache Kafka” has introduced in 2011

Here I am brining a short course for Kafka where try to provide a basic understanding of Kafka with it’s core architecture and some hands-on on the producer consumer code.

So let’s get started 😊

What is Kafka?

Apache Kafka was originated at LinkedIn and later became an open-sourced Apache project in 2011,  then a first-class Apache project in 2012. Kafka is written in Scala and Java.

Apache Kafka is a publisher-subscriber concept based on a fault-tolerant messaging system. It is fast, scalable, and distributed by design.

“Kafka is an Event Streaming architecture.”

Event streaming is capturing data in real-time from various event sources like databases, cloud services, software applications, etc.

Why Kafka?

Kafka is a messaging system. This is typically suits for the application that requires high throughput and low latency. It can be used for real-time analytics.

Kafka can work with Flume/Flafka, Spark Streaming, Storm, HBase, Flink, and Spark for real-time ingesting, analysis and processing of streaming data. Kafka is a data stream used to feed Hadoop BigData lakes. Kafka brokers support massive message streams for a low-latency follow-up analysis in Hadoop or Spark.

Basics of Kafka:

Apache.org states that:

  • Kafka runs as a cluster on one or more servers.
  • The Kafka cluster stores a stream of records in categories called topics.
  • Each record consists of a key, a value, and a timestamp.

Key Concepts :

Events and Offset :

Kafka uses Log data structure to store the Event/Messages. Each message/Event has a unique Key. Kafka ensures that the message should not be duplicate and must be in sequence.

Offsets are the pointers to understand from where data needs to be picked.

Events/Messages can stay in the partition for very long period and even forever.

Topic and Partitions :

Topic is a uniquely defined category in which producer publishes messages.

Each topic contain one or many partitions. Partitions contains messages.

Messages are written to topics and kafka uses round robin to selects which partition to write the message to.

To make sure that some particular type of messages should go to same partition we can assign Key to the messages, attaching a key to messages will ensure messages with the same key always go to the same partition in a topic. Kafka guarantees order within a partition, but not across partitions in a topic.

Cluster and Broker :

Kafka cluster can have multiple brokers inside it, to maintain load balancing. A single Kafka server is called as Kafka broker. Kafka cluster is stateless hence to maintain cluster state Kafka uses Zookeeper.

I’ll cover zookeeper in the next point. For now let’s understand what is broker.

Broker receives messages from producer and assign offset to it and then store it on local disk.

Broker is also responsible to serve message fetch request coming from consumer.

Each broker contains one or more Topics. Each topic along with their partitions can be assigned to multiple broker but the owner or leader will be only one.

For example in the below diagram Partition 0 is replicated along with topic X in Broker 1 and Broker 2, but the leader will always be only one. The replica is used as a backup of partition. So that if any particular broker fails then the replicator takes leadership.

Producer and consumer only connects to the Leader partition.

Zookeeper:

Kafka uses Zookeeper to maintain and coordinate between brokers.

Zookeeper is also sends notification to the Producer and consumer about the presence of any new broker or if any new leader created. So that according to that they can make decision and start coordinating  the task accordingly.

Consumer Group:

A consumer group is a platform where we can have multiple consumers. Each consumer group has one unique Id.

Only one consume in the group can pull the messages from a particular partition. Same consumer group can not have multiple consumers of same partition.  

Multiple consumers can consume messages from same partition but they must be from different consumer groups.

If the consumers are more in same group and partitions are less then there are changes to have some inactive consumers in the group.

Summery:

Kafka is an event based messaging system. Mostly suited for applications where big amount of real time data needs to be processed.

In the complete architecture of Kafka it provides load balancing, data backup, maintain message order, facility to read messages from a particular position, message storage for longer period, message can be fetched by multiple consumers of different groups.

Next -> Kafka: Install and Run Apache Kafka on windows